Hello, crafty friends!
This month, I've been absolutely delighted to dive into the world of flowers instead of holiday images! With the launch of the Online Exclusives, I've become completely smitten with the Happy Hibiscus bundle. I've lost track of how many cards I've made with this set, and I know I'll keep creating more.
A fun technique I've been using is the 4-card wonder. It's a fantastic way to maximize your stamping time and create multiple cards with minimal effort. I've already made four sets using this technique!
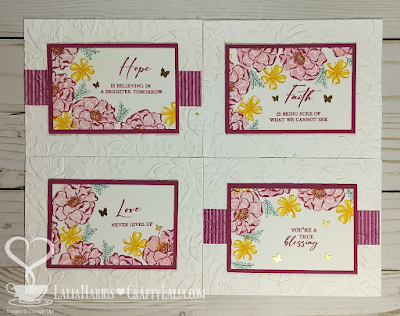
Recently, I documented the process of creating a 4-card wonder set with the Flowers of Beauty bundle. It was a delightful experience, even though my cardstock pieces seemed to shrink with each rendition of the 4 card wonder! This just goes to show how versatile this technique is—you can adjust the size to your liking.
First, I cut my base piece of cardstock and scored it in the middle vertically & horizontally so I have 4 panels of equal size. This piece is 5" by 7.5" and will be for all 4 cards. I edited this phot to show where I created the score lines for your reference.
I stamped the largest flower first. Some of the flowers dominated one quadrant more than the other so I alternated where they would be dominant. I added the small flowers and the bitty greenery. When done, I cut it apart.
Once cut apart, each piece was 3.75" wide and 2.5" tall. I added sentiments from Unbounded Love Stamp set in Berry Burst and matted them with Berry Burst Cardstock. I embossed 4.25x 5.5" pieces of cardstock with Layered Flowers 3D embossing folder.
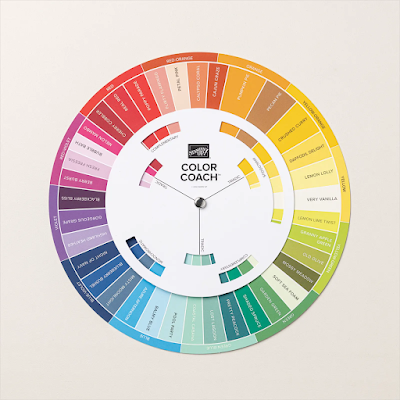
I chose to not use the colors from the Unbounded Beauty paper pack. I don't own all of the ink colors quite yet. Instead, I based my colors on the new Color Coach that Stampin' Up released this month. Berry Burst, Crushed Curry, and Lost Lagoon. These colors are triadic, or form a perfect triangle across from each other on the color wheel. This Color Coach ™ is available to everyone on the Stampin'Up! website.
Now back to the Happy Hibiscus! I used the 4 card wonder method on a full sheet of cardstock 8.5x11" and stamped Happy Hibiscus in Daffodil Delight and Crushed Curry. I trimmed a 1/4" from the panels to expose a little bit of the Crumb Cake cardstock used as the card base.
I also recreated them using purples when a friend asked me about some hibiscus that weren't yellow. I used the "puddle pad" technique to stamp the solid part of the flowers. This puddle pad is created by using foam or in my case, a baby wipe and puddling ink refill onto it. For this set of cards, I used 2 shades of purple & two shades of pink. These bottles of ink are Re-inkers from Close to My Heart. They're great for all sorts of projects in addition to refilling an ink pad. The colors I used were Royal, Pansy, Raspberry and Pixie. I demonstrated how to create the puddle pad on a FB Live when I created the next set of cards. That video is here.
I also embellished my cards with flowers I stamped & diecut from the same set of stamps. There's tons of texture and dimension on these cards. I mounted them on Royal purple card fronts and accented with the Gold Woven Leaves, Adhesive Backed Gold Heart Sequins and Brass Butterflies.
For my 4th set of cards, I used the Marbled Elegance collection. It's also an online exclusive that launched this November. This piece of cardstock that I stamped on is smaller than the ones from the Happy Hibiscus sets. It's not going to cover the card front. I did this so more of the background paper on the card front would show. This was also puddle pad stamping and I used Ink Refills in Scarlet, Candy Apple and Flamingo from Close to My Heart. I did this on a Facebook live on my FB page here.


.png)


No comments:
Post a Comment