Showing posts with label _My Art. Show all posts

Monday, November 18, 2024

4 Card Wonder Stamping Tutorial

Hello, crafty friends!

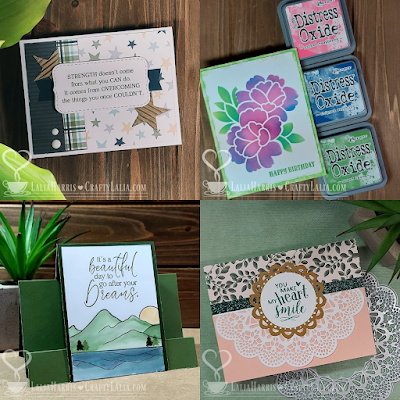
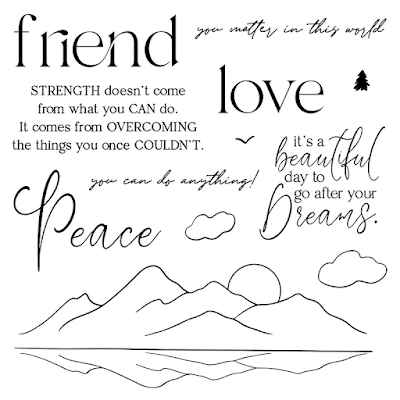
This month, I've been absolutely delighted to dive into the world of flowers instead of holiday images! With the launch of the Online Exclusives, I've become completely smitten with the Happy Hibiscus bundle. I've lost track of how many cards I've made with this set, and I know I'll keep creating more.

A fun technique I've been using is the 4-card wonder. It's a fantastic way to maximize your stamping time and create multiple cards with minimal effort. I've already made four sets using this technique!

Recently, I documented the process of creating a 4-card wonder set with the Flowers of Beauty bundle. It was a delightful experience, even though my cardstock pieces seemed to shrink with each rendition of the 4 card wonder! This just goes to show how versatile this technique is—you can adjust the size to your liking.


First, I cut my base piece of cardstock and scored it in the middle vertically & horizontally so I have 4 panels of equal size.  This piece is 5" by 7.5" and will be for all 4 cards.  I edited this phot to show where I created the score lines for your reference.  


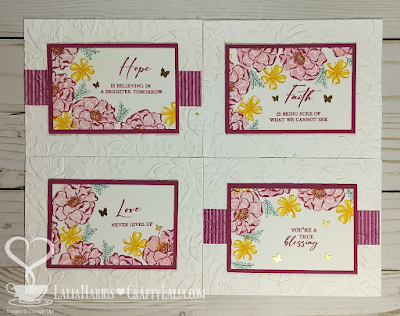
I stamped the largest flower first.  Some of the flowers dominated one quadrant more than the other so I alternated where they would be dominant.  I added the small flowers and the bitty greenery.  When done, I cut it apart.


Once cut apart, each piece was 3.75" wide and 2.5" tall.  I added sentiments from Unbounded Love Stamp set in Berry Burst and matted them with Berry Burst Cardstock.  I embossed  4.25x 5.5" pieces of cardstock with Layered Flowers 3D embossing folder.  

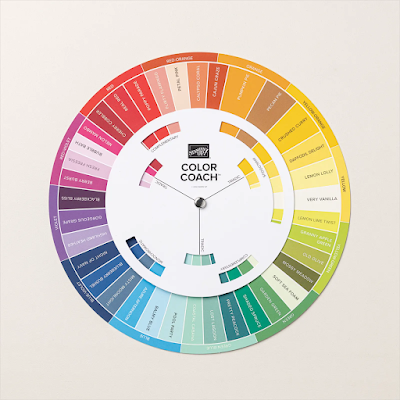
I chose to not use the colors from the Unbounded Beauty paper pack.  I don't own all of the ink colors quite yet.  Instead, I based my colors on the new Color Coach that Stampin' Up released this month.  Berry Burst, Crushed Curry, and Lost Lagoon. These colors are triadic, or form a perfect triangle across from each other on the color wheel.  This Color Coach ™ is available to everyone on the Stampin'Up! website.  


Here's my finished cards.  My favorite embellishments, the Brush Brass Butterflies, are used on these cards.  They're shiny, unique and flat so my mail carrier won't ask for extra postage.  


Now back to the Happy Hibiscus!  I used the 4 card wonder method on a full sheet of cardstock 8.5x11" and stamped Happy Hibiscus in Daffodil Delight and Crushed Curry.  I trimmed a 1/4" from the panels to expose a little bit of the Crumb Cake cardstock used as the card base.   


I also recreated them using purples when a friend asked me about some hibiscus that weren't yellow.   I used the "puddle pad" technique to stamp the solid part of the flowers.  This puddle pad is created by using foam or in my case, a baby wipe and puddling ink refill onto it.  For this set of cards, I used 2 shades of purple & two shades of pink.  These bottles of ink are Re-inkers from Close to My Heart.  They're great for all sorts of projects in addition to refilling an ink pad.  The colors I used were Royal, Pansy, Raspberry and Pixie.  I demonstrated how to create the puddle pad on a FB Live when I created the next set of cards.  That video is here.  

I also embellished my cards with flowers I stamped & diecut from the same set of stamps.  There's tons of texture and dimension on these cards.  I mounted them on Royal purple card fronts and accented with the Gold Woven Leaves, Adhesive Backed Gold Heart Sequins and Brass Butterflies.


For my 4th set of cards, I used the Marbled Elegance collection. It's also an online exclusive that launched this November.  This piece of cardstock that I stamped on is smaller than the ones from the Happy Hibiscus sets. It's not going to cover the card front.  I did this so more of the background paper on the card front would show.  This was also puddle pad stamping and I used Ink Refills in Scarlet, Candy Apple and Flamingo from Close to My Heart. I did this on a Facebook live on my FB page here.  


I followed up my first Facebook live with a peek at the finished cards.  It's quick and less than 4 minutes.  You can see it here.  


The 4 card wonder is a great way to make a set of cards that are cohesive, work well as a set but yet are still unique.  If you like stamping, this is a fun activity.  


Monday, November 4, 2024

A Whole Lot of Festive


Hello, crafty friends!

Is it too late to share a super simple, super affordable card-making idea? I hope not!

This easy project yields a whopping 30 cards, perfect for holiday gifting or stocking up your card stash. And the best part? No need for extra postage!

Want to make even more? Grab a friend and double the fun! Plus, you can stretch your supplies even further with a sentiment pack that's enough for two card kits.

Let's get crafting.


These cards are so versatile and festive! 


Every card has a touch of gold foil


If you don't send all of these cards this year, you won't have to worry about sending duplicates next year.


My only regret is not having the Snowflake Sky 3D embossing folder on hand for some of these cards. 


Shopping List

30 cards and envelopes in A2 size, 4¼" x 5½"
* A Little Bit of Festive Designer Series Paper
* One 12x12 sheet of cardstock or two 8.5x11" sheets of the following: Pretty Peacock, Cherry Cobbler, Real Red and Garden Green. You can also purchase the Regals 12x12 Cardstock pack
* One sheet of 12x12 or two 8.5x11" sheets of White Cardstock. Basic White or White Willow
* Joyful Sayings Mix & Match Ephemera Pack (only need half of a pack)
* Your favorite adhesive.  You'll need a fine tip applicator for some items, especially the gold foil sentiments.  
* Dimensionals.  A sheet of mini & regular are suggested unless you want to cut up the larger ones.  

When you purchase these items or any combination of $35 from my website I'll send you the full color instructions with cutting guide.  Please use Hostess Code YJ7JEGMQ  in November 2024.  

Are you a Demonstrator and would like to offer this workshop to your customers?  You may purchase the workshop instructions directly from me for $12. Upon receiving your payment, I'll email you the files within 24 hours.  Usually it's much sooner than that.  

cards
Powered by paypal


Pre-cut kits available in early November

Would you like a pre-cut kit or to attend an in-person event to create these cards in Everett, WA?  

I'm taking orders for kits between now & November 14th for kits and my class that will be held on Saturday, November 23rd starting at 11am.  

Kits are $37 plus applicable shipping.  This is a bargain workshop because I'm clearing out my stash of non-SU envelopes and card bases.  

Click here to go to my workshop registration page.  After November 14, 2024 this link will not show the Whole Lot of Festive workshop.  


Monday, February 5, 2024

CTMH Love Notes

Love Notes is the Valentine paper for 2024 from Close to My Heart and I've thoroughly enjoyed playing with it in the last month!  

This collection features a paper pack with stickers, a stamp set with Thin Cut dies including an exclusive envelope and puffy heart stickers.  Two workshops have been created so you can create cards or scrapbook layouts as soon as you receive your order!  The only downside is that this is only available through February 2024 or while supplies last.   

Here's the link on the website. 
This link will take you to anything related to Love Notes and work after 2/29/24.   


This is the stamp with Thin Cut dies.  The set of dies includes an envelope that's approximately 2x3" when folded closed.  When open, you can see our amazing double sided papers!


Here's what I created....

A birthday card.  It's based on one of the workshop cards, you can see the original in the pic above.  I just flipped a paper over and changed the sentiment.  My local workshop ladies loved this flexibility.  


The bear is just so cute!  I cut him from Toffee Cardstock and used a marker to color bits of him  I snipped his arms so they would be separate from his body.  

Here's the bear with Tailgate Greetings. The background brick is from Stencil Pack 2, Z7041.  The stencils are in the annual Essentials Catalog and will be available until July 2024, unlike most of our stamp which are only available during the 2 months they're featured in a catalog.  The truck is cut from the lighter side of the Scarlet Cardstock to give it a vintage look. 


Here's the Valentine's I created for my hubby and son.  I used the Winter Gnomes Thin Cut and trimmed the blade off the ice skates to make regular shoes.  I learned the Ice Grey marker makes for great cellophane look and much less coloring!  The roses are colored with the middle shade of the Coral Shades marker.  It's RED, not coral when you're using the Coral Shades.  

I admit it, this card's a little cheesy, just how I like my Valentine's Day.  Surf and Turf are a favorite food of my hubby and I, but my son won't touch steak.  Pizza is a love language in our home.  That piece of pizza is a banner piece on the sticker sheet.  It's supposed to be roses, but not in my house.  


I adhered the banner to a piece of Shortbread cardstock and trimmed out like it was a slice of pizza.  It was super simple. This is a Z fold card.  I started with a 4.25" x 11" piece of White Daisy cardstock and scored it at 2.75" and 5.5" and folded it back and forth.  


This is my pride and joy!  Nine years ago, I did a series of "Seasonal Samplers."  I didn't care for the pink, grey and Glacier sampler and have been looking forward to updating it.  


After hanging it on my wall, I've decided to swap the light colored hearts under Be Mine to all Scarlet & Candy Apple, but that has yet to happen.  But I'm in love.  
This hummingbird is from Hummingbird Wings C2007 or Z7112 with Thin Cuts.  The flowers are stickers from the paper pack.  I dusted the back with Anti-static Pouch Z4220 and trimmed the ones that were a circle.  Then added 3D foam tape (1 or two layers) for dimension

This square features the doily and flourish from Sweet Memories Cardmaking Workshop Your Way.  The doily is cut from the paper pack.  

This little bear made 2 appearances on my sampler.  Once in the truck's tailgate and again the envelope.  


With the leftover paper, I created some little goody bags.  They are super simple and use a 5.5" square of paper and a 2.75 x 1" scrap at the top that's completely optional.  They're easy to make and are self closing, even without the pretty paper at the top.  They'll hold 2-3 Godiva chocolates or 8-10 Hershey kisses.  


Here's my cutting guide for the treat boxes.  Click to enlarge.  
fold all of the score lines inward and open flat.  Fold in the 1/2" strip and put adhesive on the side that is up.  Bring the other half of the bag over and fold it, adhering it like a flat tube.  Fold the first flap of the bottom down and inside the tube.  You'll squeeze the tube a bit so that it starts taking on a square shape.  Repeat with the 2nd flap.  Add adhesive to flaps 3 & 4 and secure, making sure the bottom of the bag is now square and the flaps overlap correctly.  You're done!  


Here's how to change the size of the treat box:  
For height, you can make them shorter or taller without changing the math.  Don't change the dimensions of the bottom of the bag in anyway.
For the base of the box, you want it to be 4 times the width of the base of the box plus 1/2".  If you want the base of the bag 2" you would need a piece of paper that is 8-1/2" wide.  2" for each side of the base and 1/2" for glue along the edge.  The base of the bag will always be square so you'll need to score 2" from the top of the paper to get square flaps.  

The biggest bag you could make from a 12x12 sheet of paper is making the base a 2-7/8" square.  You determine this by subtracting 0.5" from the 12" for the flap to seal the side.  This leaves 11.5" and that divided by 4 is 2-7/8" per bottom square. 
You would make a horizontal score line at 2-7/8" then turn and make the vertical scores at 2-7/8", 5-3/4" 8-5/8" and 11-1/2"  It would be 9-1/8" tall!  I'm not sure what you would want to put in it, but if it a try and let me know.  If you don't like 1/8" measurements, trim your paper to 11.5" and the score lines would be 2.75, 5.5, 8.25 & 11"  Whew!  

After all of this, please let me know which one is your favorite project by leaving a comment.  

Friday, June 10, 2022

Sweet Pickings of Strawberries 🍓 & Watermelon 🍉makes for a sweet 30 card workshop with 15 designs!  

I've created this colorful workshop with 15 card designs for a total of 30 cards using 1 pack of the May-June Mix-In paper and Sweet Pickings.   There's 3 designs that have shaker elements with an option to make 3 more designs into shakers as well.


The Tutti Frutti shapes not only make fun shaker bits, but amazing, yet soft and flat card front embellishments.


These fun cards are easy to cut and assemble.  There's no fussy cutting required if you have the Thin Cut dies that accompany the stamp set.  Only 4 ink colors required.  If you mail them, no extra postage required!   These cards have tons of customizability with your choice of sentiments.  

Item #   Description

X9040    Mix-in Paper Packet (May–Jun)

Z4441    Sweet Pickings Stamp + Thin Cuts

X7281E  Tutti Frutti Mini Shapes

Z4309    Circle Shaker Window Thin Cuts

Z4310    Circle Shaker Window Foam + Acetate

X254      White Cards & Envelopes Value Pack

Z679      Liquid Glass

Z6528    Capri Exclusive Inks™ Stamp Pad

Z6520    Flamingo Exclusive Inks™ Stamp Pad

Z6513    Green Apple Exclusive Inks™ Stamp Pad

Z2805    Black Exclusive Inks™ Stamp Pad

Z3341    Thin 3-D Foam Dots

Z3547    Piercing Tool

S2206    I Heart Summer—June Stamp of the Month

Also:  3 Sheets of White Daisy & 1 sheet of Black Cardstock and a black journaling pen.  They are currently sold out on my website.  

I'm including the Stamp of the Month in this kit because it's perfect and you can customize your card workshop with some of these images and stamps.  It's just so adorable.  


To get the workshop guide, just place an order on my website of $25 or more or purchase the cutting guide for $10.

**Purchase link has been disabled**

You can order the workshop guide for personal or workshop use here.  It will be emailed within 24 hours of purchase, but most likely sooner.


Wednesday, May 18, 2022

Just a quick note & lots of photos to let you know about all the great things that CTMH has to offer in the month of May.  

It's not too late to celebrate National Scrapbooking Month with some amazing & exclusive kits.  These are all kits and only available through the end of May, while supplies last.


But first... You're invited! In 3 days I'm having a card workshop that's in my home.  These 4 cards & the Taco card shown below are the ones we'll be making.   Friday, 5/20 at 6:30 pm in Everett, WA.  Email me if you would like to come. The costs $15 for the evening of fun, learning and laughter.  

Can't come in May, add June 24th to your calendar for the next one.  


Kits kits & more kits in celebration of National Scrapbooking Day.

My favorites are the card kits because I love making cards!

Many Wishes Card kit use stencils and ink blending to create beautiful flowers.  

Here's what I created with the kit


A Toast To You is our second card kit.  Aren't these stamps adorable?  


Here's one card I created.  I swapped around the Toast & Taco.  


Good Vibes is an Exclusive Scrapbook Kit.  No Stamping Required.  It's simply adorable.  
More photos are on the website.  


Circles and Patterns Scrapbooking Workshop Kit is using the In Full Bloom papers which were so loved along with an amazing set of circle dies to create some fun layouts.  

Little Penguins Album Workshop Kit is the best 6x6 album!  It's fun colors make a vibrant album that's good for so many occasions.  And the penguins, they're so plentiful and adorable!  


The May Stamp of the Month kit!


This ready-to create kit will be yours (cards will be even more amazing than pictured) when you purchase the Stamp of the Month for $5  with at $50 order.  VIP customers get this stamp for free with their $50 order.  


Remember when I said that you get the Stamp of the Month for FREE when you're a VIP?  
This month is the last month to get this fun collection of acrylic shapes for free when you sign up as a VIP for the first time.  It retails for $19.95 and is only available to new & existing VIP members.  

Look at all of these shapes!  


There's a whole new catalog!