Showing posts with label Teacher Gifts. Show all posts

Monday, February 5, 2024

CTMH Love Notes

Love Notes is the Valentine paper for 2024 from Close to My Heart and I've thoroughly enjoyed playing with it in the last month!  

This collection features a paper pack with stickers, a stamp set with Thin Cut dies including an exclusive envelope and puffy heart stickers.  Two workshops have been created so you can create cards or scrapbook layouts as soon as you receive your order!  The only downside is that this is only available through February 2024 or while supplies last.   

Here's the link on the website. 
This link will take you to anything related to Love Notes and work after 2/29/24.   


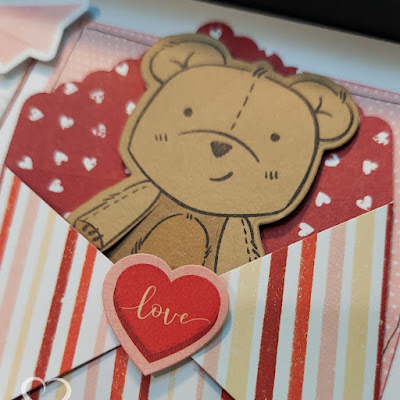
This is the stamp with Thin Cut dies.  The set of dies includes an envelope that's approximately 2x3" when folded closed.  When open, you can see our amazing double sided papers!


Here's what I created....

A birthday card.  It's based on one of the workshop cards, you can see the original in the pic above.  I just flipped a paper over and changed the sentiment.  My local workshop ladies loved this flexibility.  


The bear is just so cute!  I cut him from Toffee Cardstock and used a marker to color bits of him  I snipped his arms so they would be separate from his body.  

Here's the bear with Tailgate Greetings. The background brick is from Stencil Pack 2, Z7041.  The stencils are in the annual Essentials Catalog and will be available until July 2024, unlike most of our stamp which are only available during the 2 months they're featured in a catalog.  The truck is cut from the lighter side of the Scarlet Cardstock to give it a vintage look. 


Here's the Valentine's I created for my hubby and son.  I used the Winter Gnomes Thin Cut and trimmed the blade off the ice skates to make regular shoes.  I learned the Ice Grey marker makes for great cellophane look and much less coloring!  The roses are colored with the middle shade of the Coral Shades marker.  It's RED, not coral when you're using the Coral Shades.  

I admit it, this card's a little cheesy, just how I like my Valentine's Day.  Surf and Turf are a favorite food of my hubby and I, but my son won't touch steak.  Pizza is a love language in our home.  That piece of pizza is a banner piece on the sticker sheet.  It's supposed to be roses, but not in my house.  


I adhered the banner to a piece of Shortbread cardstock and trimmed out like it was a slice of pizza.  It was super simple. This is a Z fold card.  I started with a 4.25" x 11" piece of White Daisy cardstock and scored it at 2.75" and 5.5" and folded it back and forth.  


This is my pride and joy!  Nine years ago, I did a series of "Seasonal Samplers."  I didn't care for the pink, grey and Glacier sampler and have been looking forward to updating it.  


After hanging it on my wall, I've decided to swap the light colored hearts under Be Mine to all Scarlet & Candy Apple, but that has yet to happen.  But I'm in love.  
This hummingbird is from Hummingbird Wings C2007 or Z7112 with Thin Cuts.  The flowers are stickers from the paper pack.  I dusted the back with Anti-static Pouch Z4220 and trimmed the ones that were a circle.  Then added 3D foam tape (1 or two layers) for dimension

This square features the doily and flourish from Sweet Memories Cardmaking Workshop Your Way.  The doily is cut from the paper pack.  

This little bear made 2 appearances on my sampler.  Once in the truck's tailgate and again the envelope.  


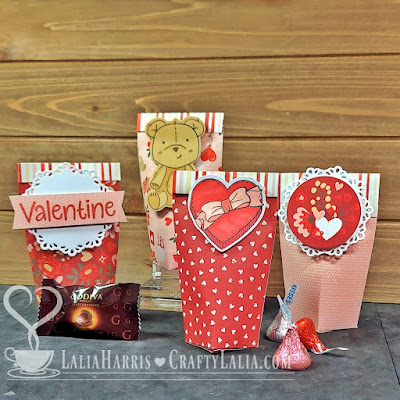
With the leftover paper, I created some little goody bags.  They are super simple and use a 5.5" square of paper and a 2.75 x 1" scrap at the top that's completely optional.  They're easy to make and are self closing, even without the pretty paper at the top.  They'll hold 2-3 Godiva chocolates or 8-10 Hershey kisses.  


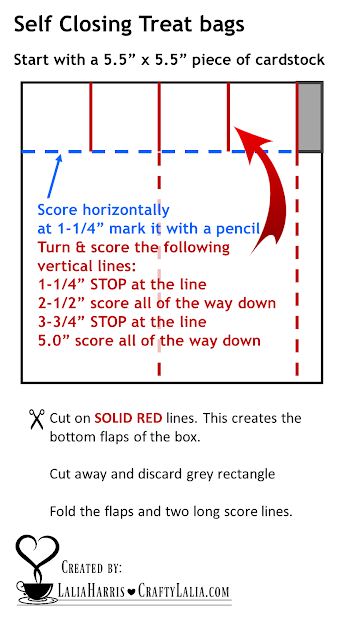
Here's my cutting guide for the treat boxes.  Click to enlarge.  
fold all of the score lines inward and open flat.  Fold in the 1/2" strip and put adhesive on the side that is up.  Bring the other half of the bag over and fold it, adhering it like a flat tube.  Fold the first flap of the bottom down and inside the tube.  You'll squeeze the tube a bit so that it starts taking on a square shape.  Repeat with the 2nd flap.  Add adhesive to flaps 3 & 4 and secure, making sure the bottom of the bag is now square and the flaps overlap correctly.  You're done!  


Here's how to change the size of the treat box:  
For height, you can make them shorter or taller without changing the math.  Don't change the dimensions of the bottom of the bag in anyway.
For the base of the box, you want it to be 4 times the width of the base of the box plus 1/2".  If you want the base of the bag 2" you would need a piece of paper that is 8-1/2" wide.  2" for each side of the base and 1/2" for glue along the edge.  The base of the bag will always be square so you'll need to score 2" from the top of the paper to get square flaps.  

The biggest bag you could make from a 12x12 sheet of paper is making the base a 2-7/8" square.  You determine this by subtracting 0.5" from the 12" for the flap to seal the side.  This leaves 11.5" and that divided by 4 is 2-7/8" per bottom square. 
You would make a horizontal score line at 2-7/8" then turn and make the vertical scores at 2-7/8", 5-3/4" 8-5/8" and 11-1/2"  It would be 9-1/8" tall!  I'm not sure what you would want to put in it, but if it a try and let me know.  If you don't like 1/8" measurements, trim your paper to 11.5" and the score lines would be 2.75, 5.5, 8.25 & 11"  Whew!  

After all of this, please let me know which one is your favorite project by leaving a comment.  

Saturday, January 28, 2017

Teacher Gifts: Redbox Movie Night & Popcorn

Last fall, I designed these fun gifts for the teachers in our co-op.  Our co-op is parent led and we couldn't do it without nearly everyone signing up to teach a class.  


I used our now-retired Sunset Orange which was perfect for a fall themed gift.  Other times of the year, I think Cranberry would be just the ticket because it's more of the movie/popcorn container color.  In my case, I had TONS of orange from a long-gone Halloween kit and very little red.  

The THANK YOU is from a new stamp set "All the Thanks" B1536 from Close To My Heart.


There's several important key factors in creating a gift.  Chocolate is at the top of the list.


We included a Redbox movie "Promo code" good for a 1 night rental.  You can buy codes in packs of 5, 10, 25, etc from Redbox.com.  Click "buy promo codes" to order these codes on the Redbox website.  When ordering them, if you list yourself as the recipient, you'll get the codes emailed to you and they can be divvied out individually.  I snagged the graphic from the email and threw it into a MS Publisher file so that I could print several per sheet of paper.  


We put it inside the bag with the popcorn so that it wouldn't get lost before getting home.  ]
The bags & ribbon are from Hobby Lobby.  Isn't the 2 sided ribbon adorable?  It was a bit fussy to tie as it is wired, but they looked great in the end.  


The star is on the same page of the Artistry Handbook as the popcorn box.  It has 2 slots in it already because it's intended to be a little sign.  We used extra thick BBQ skewers.  We cut off the tip and put the cut end down into the package so nobody would get poked.  


This file only uses the CTMH Artiste Cricut Cartridge that has been retired.  😢

I used Design Space to slice the same star into the front of the box 3 times.In the future, I might add stars to all 4 sides of the box.  

I used the attach feature in Design Space to cut 6 stars or 2 boxes per 12x12 paper.  I used my 12x24" mat with 2 12x12 sheets of paper so I could cut 4 boxes per load of my Cricut.  I was cutting 30 boxes and needed as much efficiency as possible.  

Here's the Design Space file.  If you are using this file, it won't be too hard to modify it back to a standard 12x12 mat.  Click detach, delete or hide 2 boxes and their score lines.  Attach the remaining boxes and score lines.  

I have a wonderful team of ladies who join me to assemble these boxes.  We assembled and filled 30 boxes in less than 90 minutes.  They're awesome.   

If you use my file, I'd love to see a pic of what you create.  Please post it on my CraftyLalia Facebook Page

Saturday, June 6, 2015

Latte Cup Tag & Recipe for Cold Brewed Coffee

Good morning!  
Welcome to the 2nd day of the Coffee Lover's Blog Hop!  


Today's project is a tag that I designed to go along with the teacher gifts we gave last year.  Looking back, I realized I never blogged about this cute little tag.

This tag been hanging in my office for a year and I can't believe how vibrant the CTMH inks are.  I photographed it a couple days ago on my quart jar of cold coffee.  (I didn't have any other mason jars handy and I wanted to share with you my cold coffee recipe)


Like this year's teacher gifts, it was tied on a Mason Jar that was filled with chocolate and coffee (of course!)

RECIPE:  Cold Brew Coffee in a Mason jar!  
Here's the basic recipe. Why re-invent the recipe when they've done a great job photographing it?
 I use 6 scoops of finely ground coffee and fill the quart jar with filtered water.  Be sure to shake it a couple times throughout the day.  I strain it with a similar mesh strainer and then with my old reusable mesh drip basket like this one because I use a pretty find grind.  Other websites suggest a coarse grind but then you'll have to use more coffee.

Don't toss your coffee grounds!  It's a nice big bunch of them.  Take them out and put them around a Hydrangea or Rhododendron to gently acidify the soil.  They will love it!  I have 2 bushes that I can reach from my back step that are loving the extra acid.  (In other words, I can do this in my PJ's)

You'll get a rich, concentrated cold coffee that's perfect for Iced Coffee or home-made Fraps.

Wednesday, May 6, 2015

Taste of Summer teacher gifts

Monday was our wrap-up of our Homeschool Co-op.   You could say our co-op has two themes.  One would be coffee, the other chocolate.  When the two combine, it's even better.   When it's time to celebrate our hard working volunteer teachers AKA moms, they are almost always a part of the gift.

This year we gave a Mason Jar Sipper/Straw filled with chocolate & Starbucks Via.

I love to make them cute so I added a tag that says "Thank you for an Ah-Mason year."  It really was an amazing year.  We have a dedicated group of moms who come up with creative classes for all ages.  We lead "elective" classes that support, not replace our regular home school curriculum.  It's a fun outlet for the kids AND the moms.  We support and encourage one another and love it as much as the kids do.  

I printed the circle on regular paper and punched it with my handy 2" circle punch by Fiskars.  This is my most used punch that I own.  


The pinwheel features the new Taste of Summer papers that are only available May 2015, during National Scrapbooking Month.  Aren't they luscious?  


There's 6 different double sided papers.  
I love the lemon paper with the purple on the back.  


It's a Ball quart jar and the Ball Straw and Sipper.  They are primarily sold as white but this year they've introduced some colorful lids.  


Here's the supplies we used.  I say "we" because the leadership team met at my house and together we crafted and assembled the 3 dozen jars.  It took less than an hour to do the work and another couple hours to laugh, giggle and eat chocolate before going home.  

Some links are Amazon affiliate links.  

Taste of Summer Paper Pack cut in 4" squares
We also have a stamp set, though I didn't use it on this project
Black brads
Heavy bamboo skewers with tips cut off from Winco Foods
Hot Glue
Ribbon from my stash
Easter grass
1/8" hole punch for the pinwheels
(be sure to get the ones that match the size of your jar)
or 
We had some of the Sea Salt Milk Chocolate Truffles, Dark Chocolate Truffles, and ones with White Chocolate.  The Peanut Butter ones are pretty amazing too.  Are you hungry yet?  I had to stop and fix lunch before finishing this post.

To make the pinwheel, I cut a 4" square of paper (you'll get 9 per sheet, Yay!)
Here's a template for the pinwheel--It's from the Macaroni kid website.  
I hot glued a BBQ skewer to the back.  I used a pair of garden pruners to snip the point off the skewer and then buried the snipped end in the hot glue.  They don't spin, but they're still darling.  

Taste of Summer is only available in May 2015 from Close to My Heart.  


I've went back and labeled my teacher gift posts.  You can find all of them here.  

Saturday, December 6, 2014

Seasonal Expressions Blog Hop

Welcome to the Seasonal Expressions 1 blog hop!  If you're already hopping, you've just come from Michelle's blog. If not, you can start here and hop all the way around the circle.


The Seasonal Expresions is a 38 page "Bonus catalog" that's available now thru March 31st.  It features 2 new paper packs, a whole bunch of fresh spring stamps and new hostess rewards exclusive items.


Tonight, I'm featuring the Hostess Exclusive stamp set "Variety of Thanks" that's only available during this catalog.  Not only is it exclusive, it's only available for FREE or only $6 of your Hostess Rewards Dollars!


I've been wanting a thank you stamp set for a bit and this one is perfect!  

I am part of a home school co-op where we meet together on Mondays for fun classes for the kids and mama time.  It's completely led by the parents and we have amazing classes because parents go above and beyond with their time and creativity for these classes.  We love to thank our hard working teacher moms with a gift at the end of the session.  (FYI these classes are above and beyond our home curriculum and not in place of it

We gave them personalized key chains/zipper pulls personalized with their first initial using the CTMH Base & Bling circle pendants and glass covers.  The background paper is our Teal glitter paper.  The zipper pulls were bought online from a wholesaler by my upline.  (I don't know the website)

These were so simple to make.  It took about 90 minutes for 3 of us to assemble & package THIRTY-TWO of these as gifts!  Pretty fast and economical too!  


Kristi punched 1" circles from our teal glitter paper.  I had already cut the initials from black paper.  I used Cricut Craft Room to make sure each letter would fit inside a 0.90" circle.  Most letters ended up being 0.80 inches.  Most letters were cut from the elegant Artbooking font.  A few letters were cut from Art Philosophy.  The T & G weren't easily recognizable in Artbooking.

Kristi & I assembled the base & bling.  We pressed the glittery circle into the round pendant, centered the letter, added a bit of liquid glass and the glass dome.  Lots of baby wipes were used.  

Libby stamped the Thank You in black ink and then punched out the image with a 2" circle punch and mounted it on the 2.5" fancy scalloped circle.  


Together we packaged them up without the zipper pulls.  Whoops!  Which is why I don't have a picture of the clip. Fortunately we weren't too far into the process.  

We used our cute little Designer Creations paper bags to package them up.   This sure beats cutting out 3 dozen cute boxes on the Cricut.  Economical, fast & adorable!  I used a standard 1/4" hole punch to punch two holes in the paper and a single in the tags.  18" of ribbon made a nice bow with this lightweight ribbon.  


The ribbon was from my stash.  

Here's most of the gifts ready to go.  We used the Lagoon, Ruby & Honey paper bags.  You can purchase them here.  


If you love this stamp set as much as I do, contact me on how to obtain it.  You can't buy it!  


That's all for now, please hop on over to Donna's blog to see her amazing project.  


Saturday, May 11, 2013

Teacher Gifts

For the last 3 years I have participated in a homeschool Co-op for our son.   This co-op doesn’t replace his home curriculum.  It enhances it.  Think of it as a morning full of elective classes and fun for both of us.  It’s wonderful to be part of an amazing group of women and their children.  As a co-op, we do everything ourselves, including lead classes.   As the year was wrapping up, the leadership  wanted to thank the moms who taught spring quarter.  Here’s how we celebrated our moms/teachers this last Monday…
P1060235
There’s a story behind these boxes and how they were inspired.  Our fearless leader Libby found this adorable teacher thank you gift on Pinterest. Here’s the original post on www.skiptomylou.org.

It looked so simple to replicate. Gloves: Check! Seeds: Check!   Chalk board adhesive vinyl:  CTMH sells that too!  Container: Ikea is 50 miles away and affordable options at local stores were not found.  
I also really disliked the thought of investing in something that could end up being tossed.
The perfect solution…. I love cutting boxes on my Cricut with my Art Philosophy or Artiste Cricut cartridges.  However, I rarely have anything to put inside of them.  Oh joy!  Now I can play with paper and make something purposeful.  Or 21 purposeful items in this case!
The pillow box and the 3D flowers were cut using the Art Philosophy Cricut Cartridge.  I cut and rolled 2 dozen flowers while watching a movie one afternoon.  With the quilling tool that CTMH recently added to their Idea Book, it was a cinch and didn’t take my full concentration.  Everything else was assembled by our advisory team around my dining room table one evening last week.  It was quick and simple.  There was plenty of laughter and chocolate too. 
P1060236
The flower and sentiment is a magnet keepsake.  The magnet, seed packs and pillow box are all held together with twine.  The recipient could easily reuse or recycle this pillow box. 
Inside the box are quality gardening gloves just like in the original picture and CHOCOLATE which seemed to missing in the original teacher gift.  (do you see a theme here?)
P1060237
I love how these two Cricut cartridges are so versatile and go far beyond scrapbooking and card-making to blessing our hardworking teachers of our Co-op. 

I've just added this to the Heart to Heart Challenge blog for this week:  Teacher Appreciation week.  It was entirely made with Art Philosophy and Artiste Cricut shapes and some retired green paper.  Sorry, no current CTMH product except for Liquid Glass.