Showing posts with label tutorial. Show all posts

Monday, November 18, 2024

4 Card Wonder Stamping Tutorial

Hello, crafty friends!

This month, I've been absolutely delighted to dive into the world of flowers instead of holiday images! With the launch of the Online Exclusives, I've become completely smitten with the Happy Hibiscus bundle. I've lost track of how many cards I've made with this set, and I know I'll keep creating more.

A fun technique I've been using is the 4-card wonder. It's a fantastic way to maximize your stamping time and create multiple cards with minimal effort. I've already made four sets using this technique!

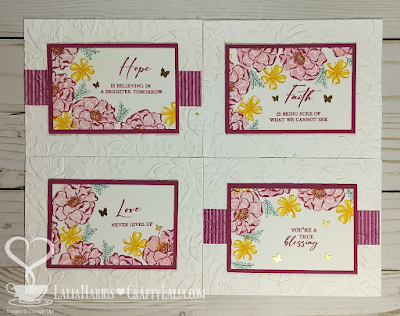
Recently, I documented the process of creating a 4-card wonder set with the Flowers of Beauty bundle. It was a delightful experience, even though my cardstock pieces seemed to shrink with each rendition of the 4 card wonder! This just goes to show how versatile this technique is—you can adjust the size to your liking.


First, I cut my base piece of cardstock and scored it in the middle vertically & horizontally so I have 4 panels of equal size.  This piece is 5" by 7.5" and will be for all 4 cards.  I edited this phot to show where I created the score lines for your reference.  


I stamped the largest flower first.  Some of the flowers dominated one quadrant more than the other so I alternated where they would be dominant.  I added the small flowers and the bitty greenery.  When done, I cut it apart.


Once cut apart, each piece was 3.75" wide and 2.5" tall.  I added sentiments from Unbounded Love Stamp set in Berry Burst and matted them with Berry Burst Cardstock.  I embossed  4.25x 5.5" pieces of cardstock with Layered Flowers 3D embossing folder.  

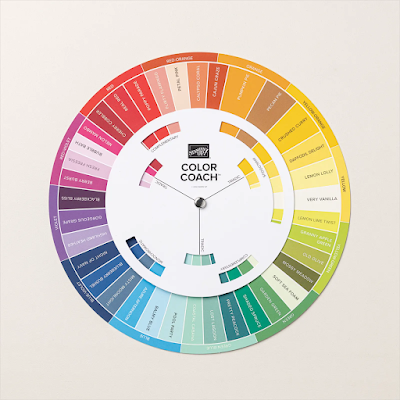
I chose to not use the colors from the Unbounded Beauty paper pack.  I don't own all of the ink colors quite yet.  Instead, I based my colors on the new Color Coach that Stampin' Up released this month.  Berry Burst, Crushed Curry, and Lost Lagoon. These colors are triadic, or form a perfect triangle across from each other on the color wheel.  This Color Coach ™ is available to everyone on the Stampin'Up! website.  


Here's my finished cards.  My favorite embellishments, the Brush Brass Butterflies, are used on these cards.  They're shiny, unique and flat so my mail carrier won't ask for extra postage.  


Now back to the Happy Hibiscus!  I used the 4 card wonder method on a full sheet of cardstock 8.5x11" and stamped Happy Hibiscus in Daffodil Delight and Crushed Curry.  I trimmed a 1/4" from the panels to expose a little bit of the Crumb Cake cardstock used as the card base.   


I also recreated them using purples when a friend asked me about some hibiscus that weren't yellow.   I used the "puddle pad" technique to stamp the solid part of the flowers.  This puddle pad is created by using foam or in my case, a baby wipe and puddling ink refill onto it.  For this set of cards, I used 2 shades of purple & two shades of pink.  These bottles of ink are Re-inkers from Close to My Heart.  They're great for all sorts of projects in addition to refilling an ink pad.  The colors I used were Royal, Pansy, Raspberry and Pixie.  I demonstrated how to create the puddle pad on a FB Live when I created the next set of cards.  That video is here.  

I also embellished my cards with flowers I stamped & diecut from the same set of stamps.  There's tons of texture and dimension on these cards.  I mounted them on Royal purple card fronts and accented with the Gold Woven Leaves, Adhesive Backed Gold Heart Sequins and Brass Butterflies.


For my 4th set of cards, I used the Marbled Elegance collection. It's also an online exclusive that launched this November.  This piece of cardstock that I stamped on is smaller than the ones from the Happy Hibiscus sets. It's not going to cover the card front.  I did this so more of the background paper on the card front would show.  This was also puddle pad stamping and I used Ink Refills in Scarlet, Candy Apple and Flamingo from Close to My Heart. I did this on a Facebook live on my FB page here.  


I followed up my first Facebook live with a peek at the finished cards.  It's quick and less than 4 minutes.  You can see it here.  


The 4 card wonder is a great way to make a set of cards that are cohesive, work well as a set but yet are still unique.  If you like stamping, this is a fun activity.  


Thursday, May 7, 2020

Oh Poo!

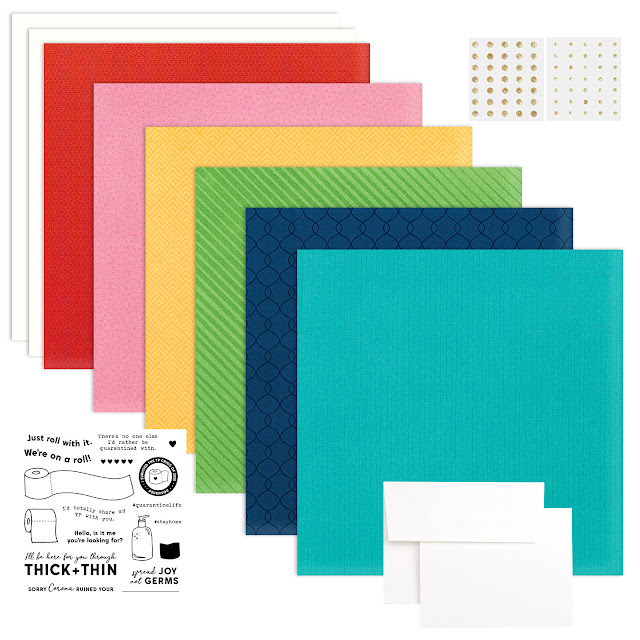
Early last month, I showed this Eclipse technique on my Facebook page.  Then when I received my Though Thick & Thin stamp set which is part of the NSD Cardmaking Bundle #1, I knew I had to try it as well.  This bundle is while supplies last in May 2020.


Inside says, "Sorry Corona ruined your ____________"

In short, I random stamped a piece of cardstock. Die cut the sentiment and only colored the die cut. I then reassembled the pieces on a card front and elevated the letters with foam tape.

Clear as mud?  That's why I created a video.  The rose stamp shown in the video is currently available.  It's called the Yesterday & Today Cardmaking Stamp Set.


For the hi card, I used my Cricut.  I centered "hi" in the middle of a rectangle that's 3.75 x 5" on my Cricut mat.  With the letters in place on my Cricut Mat or taped with Washi tape on the back, I stamped the flowers.  You'll need an outline stamp that can be colored.  Stamp in a black ink that's compatible with the type of marker or colored pencil you're planning to use.

I used shimmer brushes on this set.

Supplies used in Oh Poo Card


More photos of the TP card kit.
This kit has supplies for 20 cards.  Just add ink & adhesives.

Monday, July 23, 2018

Starburst Cards & Big Dies

Hello friends,  
Have you ever made a sunburst card?  I have several bursting cards to show you and a how-to video in today's post 


In this first card, I used an array of pink and red cardstock.  Our cardstock is now double sided which means the backside is a lighter version of the front.  (There's always been color on both sides).  This opens up so many wonderful options for new colors!  

To get started, you need 3 strips of paper each cut 1x12".  Then take them and cut them again so you have 5 & 7" segments. Now cut them diagonally to make long skinny triangles.  
You'll be glueing them down to a base sheet and grabbing your paper trimmer to clean up the edges.  

Here's the video showing you how I did it.  


Now let's talk about the very front of the card.  Aren't these dies amazing?  They make creating a birthday or thank you card so quick and easy.  

They cut cardstock, vellum, foils and glitter paper beautifully.  


Colors for our local Highschool.  I snipped off the candles.  I also made the sunburst panel 1/8" smaller overall so I could matte it in black.


Football colors!  You'll get to make this card at my Football Fan workshop https://www.facebook.com/CraftyLalia/events on Aug 21st.  Kits are available!  

Don't forget, when you spend $50 on my website in any month, you'll receive happy mail from me! Often, but not always, they are pre-cut card kits of some of the cards I've featured on this blog, but not always!  

With joy in my heart and coffee in my cup, have a great day!


Sunday, January 7, 2018

Meet Chelsea Gardens

Hello friends,

Today I have a new paper pack I'd like to introduce.  Chelsea Gardens is a pack with soft greens and greys and butterflies.

I paired the cardmaking stamp set with coordinating thin cuts with the January Stamp of the Month.


I stamped and embossed the branch and butterfly in silver on vellum paper.  Vellum is easy to emboss.  In fact, that's a fool proof way to guarantee your ink won't smear before drying. To make the muted colors of the butterfly, I colored on the back of the vellum after embossing.  And for the leaves, I colored on the back and then flipped it back over and added a bit more green to darken half of each leaf.

Here's a video showing how I assembled this card.


Supplies used

Be sure to take advantage of the Stamp of the Month savings this month as well as checking out the Love Letters that are only available in January.


Monday, June 12, 2017

Fidget Spinner Card

With fidget spinners being all the rage, I just *had* to make a fidget penny spinner!


This is the card I created for my son's birthday last week. I used the long retired Confetti Wishes blue paper and the new Willow Cardstock to give a Seahawks vibe!  

Creating in birthday - stealth mode, I didn't create a video, but a slideshow from still shots I took so he wouldn't hear me talking.  If I say "fidget," his ears perk up.

I used Sway, a Microsoft Office product, for this slideshow.  It was pretty simple to create but it appears that you'll need to manually click through it.  It will take a few seconds to load.  I'd love to know how it plays.  I actually thought it would export to an MP4 so I could upload it to a video.  


This is the link to the Design Space file that contains the slot.  The Fidget Spinner piece is an SVG file.  I cannot share this file if it contains the spinner because it's an uploaded SVG.  Use Detach prior to resizing.  Then click Attach again.  I didn't use Slice because I wanted the ability to adjust the size of the spinner hole.

This is the link to the Fidget Spinner SVG.  I sized it at 2.4" tall.  I also duplicated it and used the Hide Contour feature to hide all the inner circles on the black layer.

In reality, you can also use your paper trimmer to cut a rectangular slot with your paper trimmer.  Just make it about 1/16" taller than your foam dot.

Other penny spinners I've created:  This was a Stamp of the Month from May 2013!


And a round spinner with last year's Penelope paper


This is the link to the round slot.

All of these cards were designed using 3/8" 3D foam dots.  I used these dots.  They're 3/8" and 1/8" thick.  Some dots are super thick and make for a very bulky card.

You'll need plenty of 3D foam for making the layers.  DO NOT use the thin foam or you penny won't spin freely.  It's wonderful for cards, just not these cards.

I will be hosting a class making 3 of these cards, 2 slots & 1 circle style at my house on Tuesday, June 27th at 6:30.  I will also have kits and a video tutorial.  See my full list of classes here.  When you register, you can let me know if you have a preference on your spinner.  (Do they all need to be fidget spinners?)

With joy in my heart and coffee in my cup, have a wonderful day!


Saturday, April 8, 2017

Triple Time Stamping with Live Beautifully

Hello and happy Saturday!
I'd love to introduce you to triple time stamping and give you a peek at the stamp and papers that will be featured next month!

This is a technique where you stamp on 3 layers of paper at one time.  Hence the name of Triple Time.


It looks more complicated than it really is which is my favorite part.

On this card, I used the Live Beautifully stamp set for the May 2017 National Scrapbooking Day (or Month) campaign from Close To My Heart.  When I first saw this stamp set I knew it would be great for this technique.  I like to use a large, fairly solid stamp for this technique because it does require me to push hard to stamp across the 3 layers of cardstock.  Usually I tell my friends, "don't perform CPR on your stamp (press down so hard on the stamp that it requires both hands).  You'll crush it and it and the image will be blurry."  In this technique, you want a sturdy stamp.

The stamp set used on this card will only be available May 1 thru 31 of 2017.  There's also a beautiful paper pack and scrapbook kit too.  Scroll to the bottom to see more.  In the meantime, here's a step by step tutorial.

There's 2 ways to cut your paper for this.  Many people start with a colored cardstock base and build up.

Not me.  I used a card base. I like my version because it uses less paper and there's more of the stamped image visible.  My upline & friend Michele Rowley showed me this trick of using less paper a few years back.  I've hung on to her card for years and recently put it in a safe place.  Of course that means I can't find it.  But I'm pretty sure the dimensions are the same.

White cardstock 
5.5 x 4.25 (or card base)
4.5 x 3.25
3.5 x 2.25

Notice how each one is 1" smaller?  That is key.  Knowing this, you can make a card of any dimension.  Square ones would be beautiful.

Now the colored cardstock/glitter paper.
The first one is .25" larger than the second layer of the white cardstock.
4.75 x 3.5
3.75 x 2.5. I used glitter paper on this layer.  It is also 1" smaller than the cardstock layer above it.

Now for the fun!

Set the colored cardstock side and grab some temporary adhesive.  Don't have any? Use a 1/4" of tape runner and rub your finger on it to lose most of its stickiness.

You'll be tacking the layers down temporarily.   Use just a tiny bit in the middle of each card.  I'm serious.  A half inch line of adhesive will be plenty.

Stack your 3 white cardstock layers.  Centering them as they'll be when finished.  Some people will tilt their pieces.  Let's stick to simple and centered today.

Let's start stamping.  I like to use fairly large and solid stamps for a project like this.  You'll be pressing hard.  Like doing CPR.  Baby stamps, like infants won't hold up under full chest commissions.


Stamp the flowers in a triangle configuration.  This looks random and natural.  I missed taking a pic of this until a step or two later. (see below)

I stamp on a solid surface with a piece if foam under the cardstock.  I use a scratch piece of paper to protect the foam from ink.  Foam doesn't soak up ink.  It will smear all over the next thing it touches.

Now check on the size of the gap between the layers.  It's ok to have a little. The cardstock will cover some of it.  If there's a large gap, press down again.  That's the beauty of clear blocks!  The area on the left had too much of a gap.  The light area is the ink still on the stamp that hasn't been transferred to the paper.  I pressed on the stamp again and it applied more ink to the card. (see next pic)


After stamping the 3 flowers, I needed to stamp the leaves.  I stamped a mask in a Post-it note and trimmed it out.  I was making a bunch of these cards so I made 3 masks and labeled them. I forgot to move the mask and stamped a stem across the flower accidentally.


Be sure to go across layers and off of the edge of the card.  White space is wonderful.  You don't need to fill every bit of the white paper.


The last thing I stamped was the sentiment.  I didn't stamp across layers for this.  I also didn't press hard because it would blur the image.

Next I pulled the 3 layers apart and rebuilt my card with the cardstock and glitter paper added back in.  I know that my papers are centered but I also paid attention to how the pattern lined up. I used glue dots to adhere the top layer to the glitter paper.  Glitter paper is rough and doesn't bond with a flat adhesive that well.


This is a fun and very flat card that mails beautifully.  Your friends will be impressed by your stamping prowess.  You don't have to tell them our secret.  You can let them think you're an amazing meticulous stamper who is an expert at lining things up.

Supplies used
White Daisy Cardstock
Sea Glass Cardstock, Glitter Paper, & Exclusive Ink (available now thru July 31, 2017)
Tangerine Exclusive Ink
Memento Tuxedo Black ink
Live Beautifully Stamp Set (Available May 1-31, 2017)


Here's what the full stamp set looks like.


It coordinated with the paper pack that is also only available in May.


In addition, there's a scrapbook kit!  There's pre-cut embellishments and preprinted designs that look like you spent hours cutting and designing.  It includes 10 pages to make 5 double page layouts!  Each page will actually take only a few minutes to assemble.  This kit is available 5/1/2017.


With joy in my heart and coffee in my cup, have a wonderful day!


Saturday, March 4, 2017

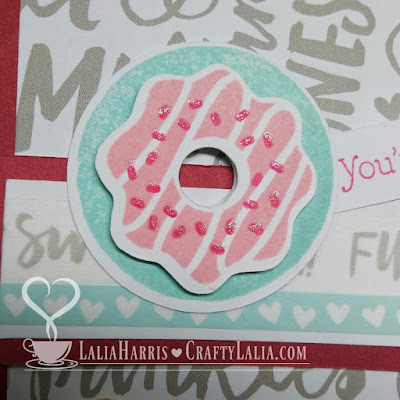
Donut Z Fold Card

Who loves donuts on the weekends?  

Not me.  I like them every day. 😜


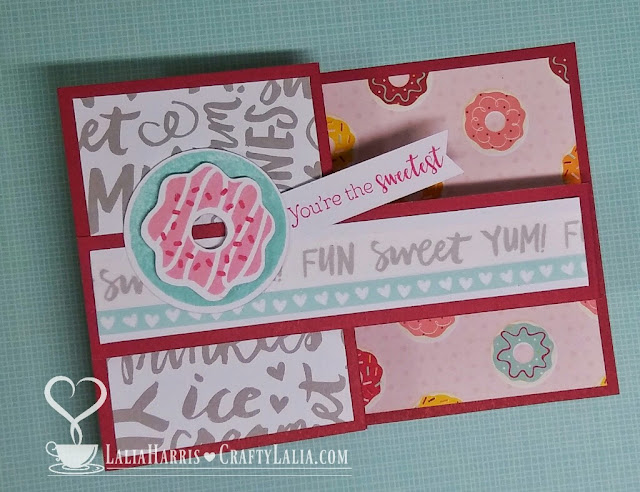
I created this Z Fold card for my January card workshop.  It's a pretty simple card to put together though there's extra folds.  


This card really is a cinch to put together.  The stamp set is from the Sugar Rush Cardmaking Bundle that includes thin cut dies that diecut the donut circle, frosting and the banner.  The grey "FUN SWEET YUM!" and the green hearts are the coordinating Sugar Rush Washi Tape!

And... this thin cut bundle is on SALE this month for just $17.96.  That makes the thin cuts just $4.01 more than buying the stamp set alone!  What a steal!


Below is an assembly video that gives all the details to create this card.
Below are the cardstock measurements
Cardstock:  5.5" wide and 11" long Score it at 2.75" and 5.5" from 1 end of the 11" wide piece.
Now cut a 1.25 x 11" wide strip from the scored cardstock.  The other piece will be 4.25 x 11 and the card base.
Front Panel 2.5" x 4"
Back Panel (donuts) 5.25" x 4"
White Daisy Cardstock for the Z-strip 5.25 x 1, 2.5 x 1, 2.5 x 1

NOTEs:  I like to score once when I'm making one or two of these cards.  If you like, you can score a 11x11 piece of cardstock and cut it into pieces to make 2 cards.  Either way, I will do all of my scoring before I cut the paper into strips for the card base and the Z-strip.
If you want to really conserve paper, make the base only 4x11 and you'll fit 3 card bases from 1 piece of cardstock and use a part of a second piece of cardstock to cut the 1.25x11 strips for the Z-strip.


This card folds flat for mailing.  It doesn't need any chunky embellishments and that makes my mail carrier so very happy!


For a little extra sparkle, I dotted the sprinkles with our CTMH Clear Shimmer Brush.  

So this month, get any of the CTMH Thin Cuts for 25% off!  

And don't forget, we have a Tea-rrific Stamp of the Month that is just $5 with a $50 purchase!  Sale and Clearance items count towards this purchase!  Isn't that wonderful?