Showing posts with label 3D project. Show all posts

Friday, September 7, 2018

Magical Mouse Christmas Village!

I've been a little MIA lately between homeschool planning responsibilities and THIS project.  I'm so excited to say that it's 99% complete and I am ready to show it to you!


First came the re-release of the Magical papers and a new stamp set last month.  We're calling it More Magical as it's with updated colors.  New blues and a beautiful Candy Apple Red.  

And then we released a new Cricut Cartridge for Christmas called Season of Joy with a Christmas Village and more!  


So I decided that they would be amazing together.  Especially if there was a certain mouse infestation!

The clock tower is so much fun... and so easy.  Do you see the ears in the snow?

Yesterday, I started simplifying things.  The clock face doesn't have tiny fiddly hands on it.  I sliced them from the white glitter and backed the white with red glitter paper.  I didn't want it hard to assemble the clock and I certainly didn't want the hands to fall off of the clock.  This will be a project that I want to last for years to come.


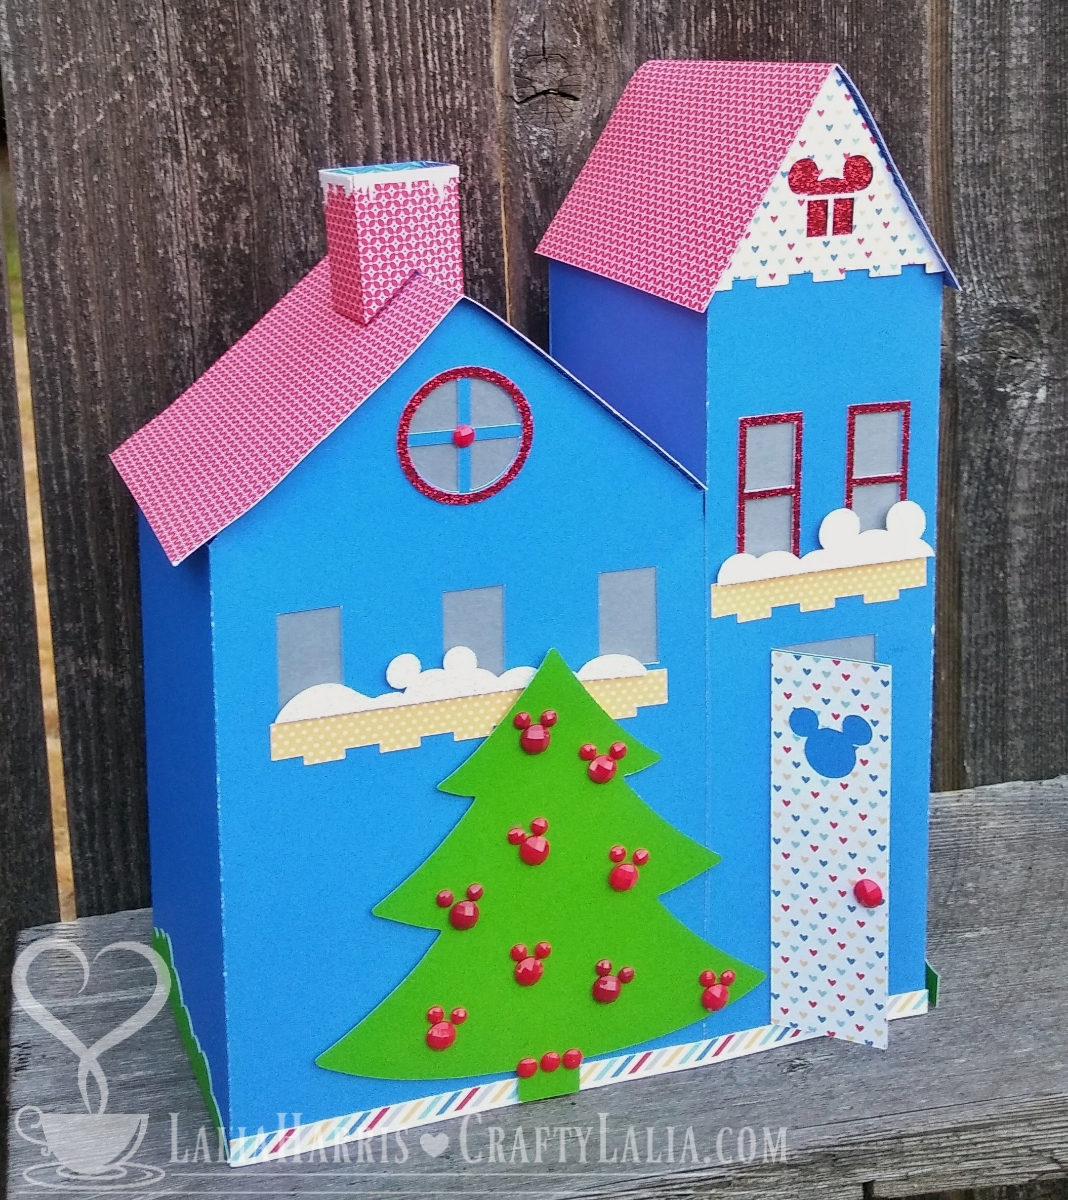
I altered this house a LOT.  Who puts a big ugly garage door on the front of a Christmas village anyway?  Not me.  I also added a chimney that's not in the original design.  Because what village would every have homes without chimneys?  Maybe one in eco friendly Seattle.  LOL.  

Ooh! Another house with a chimney!  If you refer to the image from the cartridge, you'll see this was Vanilla house #1.  


I didn't change the chapel too much, other than giving the steeple a spire.  Because this is a Magical Village, don't all pointy roofs require flags and spires?  I think I saw this in the opening credits of a movie or two on Sunday evenings when I was a kid.  


All of the images are from the CTMH Season of Joy Digital Cricut "Cartridge."  It is compatible with any of the new Explore machines and Cricut Design Space.  When you order this cartridge, you will receive a card with a scratch off code to redeem your cartridge.  It won't be emailed.  

There's also many other images on this cartridge


So let's talk about the village some more

Supply list for the Magical Mouse Christmas Village
More Magical paper pack - 1 pack (only available while supplies last in September 2018)
More Magical Cardstock  1 pack (didn't use the Candy Apple)
White Glitter Paper - 1 sheet of 3
Red Glitter Paper - 1 sheet of 3
Vellum - all 3 sheets in this pack
Red Enamel Gems - nearly the whole pack
Willow Cardstock - 1 sheet
Bluebird cardstock - 3 sheets 

In lieu of the More Magical Cardstock pack you can pull these colors from your stash:  2 canary, 1 black, 1 Carolina.

I cut everything on my Cricut Explore 2. You'll need a scoring tool in the first slot.  I didn't use fast mode as my machine doesn't score the paper very well on fast mode. 

3 ways to get the Design Space Files & Assembly Guides
  1. Place a $30 order on my website (before shipping & tax)
  2. Join my team. 
  3. Order the efiles for $20 (below)
I normally don't charge this much for files like this but this one has taken me an incredible amount of time.  I have added extra elements and structure to the files.  I've simplified them so the same shape of  piece will be used on more than one building, thus saving you time sorting pieces.  I'm proofing my files this weekend by cutting them again, just to be sure.  My plan is to have the files released by end of the day Monday, September 10, 2018.

You'll have a Consultant Release to recreate this with YOUR customers.  (not to share the files)
Assembly guides and Design Space Files that are ready to cut.  You will only need the Season of Joy Cricut Cartridge and the basic shapes that are free with Design Space to cut this village.  

**Purchase link has been disabled**

Saturday, April 14, 2018

Explosion Box Album

Hello crafty friends!

Today's post is giving you a little bit more info about a workshop I'm holding a couple times this spring.  I call it the "Important Things Box."  Last month Close to My Heart had a scrapbooking bundle called the Important Things.  It featured journaling prompts to go with specific photos.  It was a 6x8 album that was designed to help you record important aspects of your life.

I took this idea, the April Stamp of the Month and a challenge to create an explosion box and melded them all together.

An explosion box is a cube that falls open when the lid is lifted off.  Some boxes had more flaps inside, others had Easter treat baskets.  Mine's a mini album.


This album was super easy to make.  The sticky tabs on the flip flaps are used to make the album so very little additional adhesive is needed.

Supplies Used
Gimme Some Sugar Paper Pack
Bashful, Juniper and White Daisy Cardstock
3x4 and 4x4 Flip Flaps
S1804 Color Your Life
D1772 Documented Scrapbooking
D1786 Quotable Words (Available May 1)
Z4144 Peacock Stitched Ribbon
E1033 Inked Alphabet
Z2849 Peacock Ink
Z3285 Flower Market Cricut Bundle

Workshops will be held Monday, May 7th and again in early June.  Stay tuned for more fun versions.

Monday, March 6, 2017

Hello Lovely Teapot


Where there's teacups, there needs to be a teapot.

I have a fascination with making 3D papercrafts and it wasn't hard to find a 3D teapot to go along with the teacups found in the March Stamp of the Month--Tea-rrific!

I immediately thought of the Hello Lovely paper for a teapot with its beautiful floral print.  The flowers reminded me of an English garden.  

Want to make one of your own? 

Here's how:  
❤  Attend my March 30th workshop!
❤  Buy a pre-cut kit from me for $8 plus shipping.
❤  Place a $40 order on my website and I'll send you a pre-cut kit for free!
❤  Purchase the SVG file from www.Cre8iveCutz.com and cut your own.
 You'll need a Cricut Explore, Silhouette or another type of die-cutting machine that can cut SVG files to do this.


Some notes about my teapot version.
I made it as bigger than what is shown on the Cre8iveCuts website.  It is 6.5" tall.  The bowl is 5.5" in diameter.  It spans over 10" from handle to spout.  The lid is removable so you can put items inside.  The opening at the top is approximately 2.5".  The spout is functioning.  You can pour Skittles or other small dry items from it. (or small Lego pieces according to my son).


I simplified the lid by using a Scalloped Circle from Art Philosophy.
The base of my teapot is green.  If you receive a kit, it will match the lid.
This teapot takes one sheet of patterned paper for the "skin" of the pot plus 3 sheets of cardstock.
It took me about just under two hours to assemble my first tea-pot while watching Netflix.
I used Aleene's Turbo Tacky Glue.  I have found it at Michaels, Wal-Mart and JoAnn's.
Scotch also makes this fast grab glue that works. Use that link to see what it looks like.  ((It's currently overpriced on Amazon.))

Do not use double-sided tape for assembly.

If you use my Amazon link, I will receive a commission from their affiliate program.

Sunday, August 14, 2016

Sunday Funny

Sometimes we just gotta clean.  

While I was mopping on Friday morning, this came to mind.  
"My home is so clean you could eat off of a paper plate."
I dislike mopping because I just know that a sticky messy catastrophe will come before the end of the day.  On Friday, it wasn't a full glass of lemonade spilled, but enough...!

While I only have 1 boy, he really does live up to the definition of boy that I saw when he was a baby. 


Anyway, back to crafting!


This is a 3D daisy from the new Flower Market Cricut Cartridge.
I stamped the center with one of the background stamps that comes in the bundle. It's super easy to put together, just a dab of glue between each layer!  


Thursday, January 7, 2016

La Vie En Rose Display Tray

Happy New Year friends! 
Yesterday I got a little crafty with my friend and upline Michele and here’s what I created!  Michele has made a couple of these display trays over the years and I thought it was high time that I get my tray dusted off (literally) and decorated.  I have a sinking feeling that they will be discontinued this coming summer so I thought I better make use of mine ASAP.  


Do you recognize the paper pack? It’s the La Vie En Rose X7201 paper pack (sans Rose portion).  I added Sapphire and Whisper cardstock to complement the colors of our portraits that we had done last year by my friend’s daughter, Atira, of Shaggy StudiosPhotography


A little embossing and sanding adds SO MUCH TEXTURE to the lower square.  The leaves and berries are from our new Artistry Cricut cartridge.  Art Philosophy--- our beloved first cartridge is a win with the amazing roses.  Artfully Sent has a LAYERED FONT when you use it in Cricut Design Space with a Cricut Explore.  

How would you like to make one for your family?  Perhaps a Valentine’s Day or anniversary gift?  You could also do Mother’s Day or wedding or birthday gift.  One of my resolutions this year is to get things done before the last minute

I’ll doing a workshop at my home (or yours!) February 6, 2016 in the afternoon.  
Please RSVP & Pay by January 24, 2016 to reserve your spot and have all of your supplies pre-cut and ready for the workshop. You can RSVP via Facebook here or email me.

Pre-cut, ready to assemble kits can be shipped for $6 with the US.  The display tray will be drop-shipped from CTMH directly to you.  If you need any other items, I can add them to this shipment for no additional shipping. 


Here’s the best part:  It doesn’t have to be Sapphire blue!  Close to My Heart has 30 gorgeous colors and a pallet of neutral colors too.  How about Pomegranate, Poppy or Peacock?  Eggplant or Lagoon?  These are just a few of my favorite colors.

La Vie En Rose Display Tray kit - $31
6 - 3x4 pieces of La Vie En Rose Black & White B&T
4 – 3x4 embossed Sapphire or other color of cardstock
4 – 3D flower spirals to make roses in Whisper grey cardstock
1 – black mat
1 - Sapphire or other color of cardstock mat
4 – fern branches in Whisper grey cardstock
4 – berry branches Sapphire or other color of cardstock
1 – Monogram letter of your choice (two layers)

**Purchase link has been disabled**

Supplies you’ll need to complete the project
Dauber or wedge of sponge
Exclusive Inkpad (Sapphire or coordinating color)


Photos 4x6, 6x4 and 3x4.  You can also use a 4x6 and 2-3 3x4 photos. 
If you want to add any of these items to your order, contact me before placing your order.  

Are you a consultant or a DIYer? 
Receive a full color instruction sheet for assembly and the Cricut Design Space link to cut these items on the Cricut Explore. These files will be emailed within 1 day of receipt of payment.
La Vie En Rose Display Tray files - $6

**Purchase link has been disabled**

Tuesday, November 10, 2015

Thanksgiving Place Cards

Here's the place cards I created based on yesterday's pyramid card.  They're so easy!


I used the Sangria papers this time and the Artistry Cricut Cartridge for the leaf & banner. 
Here's the Cricut Design Space file.  The acorn is from our Art Philosophy Cartridge.  
If you don't have Design Space and an Explore, the Banner is 1.25" tall, the leaf is 2" and the acorn is 1.25"

Step 1:  Cut 3 squares at 4"  (You can cut them at 3" for a smaller place card.)
Score them corner to corner in just 1 direction.  Fold lightly and open back up.

Step 2:  Overlap 2 of the squares half way.  The fold will line up with the edge of the other square.
Adhere with strong adhesive.  

When you pull the first triangle over the last one, you'll get what we call a tee pee or tent.

Time to embellish.  Cut square at 3.75" or 0.25" SMALLER than the base squares.
Now cut them into triangles.  
Our SureCut Fiskars paper trimmer is great for this.  The wire lines makes it so easy to line it up and know that you're getting a perfect cut.  I've used mine for 3 or 4 years now.  

Step 5 is to apply adhesive to the back.  I love using a dot adhesive and our All-Purpose Mat.  (Actually I use only half of our mat; it's so big that I cut it in half)
NOTHING sticks to it.  And if it does, it comes up really easily.  This helps me get adhesive to and over the edge of my paper without making a mess.  

Repeat on all 3 large triangles.  The last triangle gets a little bit of contrasting paper (or the same).  I cut a 1.5" square diagonally to get this little triangle.

Now it's time to make your project stand up.  

There's two ways to do it.  One is with our Hook & Loop Dots (We can't call them Velcro (TM) because they're not made by Velcro Industries)

Another way to secure your flap is to punch holes through the 3 layers and tie with some extra thick baker's twine.  


Now to embellish and enjoy!  


I used the Etched Alphabet to stamp my name on the banner in Pomegranate ink.  
I added a Gold Bling Gem for a bit of sparkle.

I created a smaller version starting with 3" squares of Kraft Cardstock.
The pattern paper is 2.75" with a 1" punched circle for the name from the Champagne Cardstock that is included in the Sangria paper pack and tied it closed with Poppy Extra Thick Twine.

If you are not going to re-use these place cards, you can also just adhere the flap with adhesive instead of tying or using our Hook & Loop Dots.  

Be sure to check my previous post to see my first pyramid card.


Sunday, November 8, 2015

Kaleidoscope Pyramid Card


These pyramid cards that I've been seeing on Pinterest are a ton of fun!  This is a great way to introduce the new Kaleidoscope papers to you.  These cards are also called teepee cards.


I used Kaleidoscope paper and ink colors along with Shower Flowers C1612 to embellish this card.
The banner is 1.25" tall and from our new Artistry Cricut Cartridge.

This is a 3D card and it can be mailed flat in an envelope.  It will take a 5x7 envelope.

Then you just fold it and tie the cord in a pretty bow.

It's so easy to create this card, it will be one of my 5 cards for my fun & fab card workshop this month.  
The workshop is at 6:30 on November 20th since the regular 4th Friday is Thanksgiving weekend. 

Can't come to my workshop?
You can request a pre-stamped card kit shipped directly to you.
Please request your kit no later than the RSVP Workshop RSVP date of November 17th.  
5 Card Kit with shipping is just $18 (US only).

Come back on Tuesday morning for the Tutorial.


Monday, September 21, 2015

Sangria Seasonal Sampler

I think I saved the best for last, don't you?

No, I haven't been keeping this paper tucked away for a year, it's new!  This sampler features our brand new Sangria papers & assortment from the new 2015 Annual Inspirations catalog.


This features 3 SUPER EASY 3D flowers from our very 1st Cricut Bundle, Art Philosophy along with shapes from Artbooking and the brand new Artistry Cricut cartridge.  


My last workshop will be on Saturday 10/3 @ 7pm  
Click here to order a pre-cut ready to assemble kit to create on your own or at the workshop
The kit will also include 2 coordinating cards.

Want to make one on your own and have the Cricut Cartridges?  
Place an order on my website for $20 and I'll send you the Cricut Design Space Link and a project guide.  This project can also be easily created on the Cricut Expression.  

Items used:
Adventure Cardstock
Neutrals Cardstock
Cricut Bundles:  

This completes a full year of seasonal samplers.  We started in October 2014 with Halloween and we're ending in ((late)) September with Autumn.

I have a limited amount of supplies on hand for some of last year's kits. 


Wednesday, April 1, 2015

Easter 3D cards with Doodlebug Designs Paper

Easter is right upon us and I've forgotten to post the adorable cards I made early last month.  These cute cards each deserve their own post but I don't want to delay getting them up on my blog any longer. 

I have been teaching my Seasonal Sampler workshop at Lila's Scrapbooking & More, my local scrapbook store here in Everett.  With tons of Close to My Heart products in my stash and new product coming every few months, I'm hardly tempted.  But I'm a sucker for cute chicks, lambs and bunnies.  To compromise, I created 3 cards for Lila to showcase in her store during the Northwest Paper Chase which ended last weekend.  

The paper, including the cardstock is from Doodlebug Design.  It's the Easter Parade design.  As of this afternoon, Lila still had a few more sticker sheets and a bit more of paper in stock.    

These cards were so easy to make.  Lots of vibrant paper, a little bit of cutting and no fussy cutting! No stamping and only 1 Cricut cut.  My main tool was the paper trimmer! 

Here's the first card in a box I created.  

When folded, it's 5.x5" square.  You can make these cards any size.  
As with my samplers, I used corn starch on the back of the stickers to make them a simple die-cut.  


Here's a top view. You can tell that this box will fold flat.  

Box Card #2 featured 2 lambs and the birds.  I inked the edges of all of my cardstock pieces with Desert Sand CTMH Exclusive Inks.  


My favorite is the bendi or bendy card.  


They're really quite simple and don't require any more paper than a single fold card.  
My card is 5.5" square.  They can be any size you want.  Start with the envelope you want to use and scale it down from there.   
Instead of cutting a slot for each "arm" of the card to slide into, I used my embellishments and 3D Foam Tape to hold the arm.  
You can see the chicks are doing the "work."  This one is even bent a little.  


The word "Easter" was part of the stickers.  I used the old Cricut Cartridge Cuttin' Up to cut the word "Hoppy."  

I'm working on more bendi cards this week, with the new Blossom paper that is new on my website as of today!  


Happy Easter!  

Tuesday, July 29, 2014

Have you ever seen a Bendy Card?


Hello!  This is one of newest favorite styles of cards!  It’s a Bendi or Bendy card.  The design has been around for a bit but I discovered it this spring. 

I used the soon-to-retire Balloon Ride paper pack for this card with the Lifting Spirits stamp set. 

3d Card beny balloon ride front

It opens to show a hidden message and so it can fold flat for mailing (with a little extra postage).  There’s little tabs and slots that do all the work.  This is just a little card and fits in an A2 envelope.

I colored the airplane with the CTMH Watercolor pencils.  They’re so easy to use and when you purchase the blending marker, you can have soft, streak free coloring. 

3d Card bendy balloon ride opening

Inside I used the Belated Birthday stamp set. 

3d Card beny balloon ride inside

I’ve had a request for a 3D card workshop.  Stay tuned to hear the local details.  Let me know if you’d like a mail order kit!

As of today, there’s a few packs of Balloon Ride still available online.  Get it today before it’s too late!