Showing posts with label Inspiration. Show all posts

Monday, February 5, 2024

CTMH Love Notes

Love Notes is the Valentine paper for 2024 from Close to My Heart and I've thoroughly enjoyed playing with it in the last month!  

This collection features a paper pack with stickers, a stamp set with Thin Cut dies including an exclusive envelope and puffy heart stickers.  Two workshops have been created so you can create cards or scrapbook layouts as soon as you receive your order!  The only downside is that this is only available through February 2024 or while supplies last.   

Here's the link on the website. 
This link will take you to anything related to Love Notes and work after 2/29/24.   


This is the stamp with Thin Cut dies.  The set of dies includes an envelope that's approximately 2x3" when folded closed.  When open, you can see our amazing double sided papers!


Here's what I created....

A birthday card.  It's based on one of the workshop cards, you can see the original in the pic above.  I just flipped a paper over and changed the sentiment.  My local workshop ladies loved this flexibility.  


The bear is just so cute!  I cut him from Toffee Cardstock and used a marker to color bits of him  I snipped his arms so they would be separate from his body.  

Here's the bear with Tailgate Greetings. The background brick is from Stencil Pack 2, Z7041.  The stencils are in the annual Essentials Catalog and will be available until July 2024, unlike most of our stamp which are only available during the 2 months they're featured in a catalog.  The truck is cut from the lighter side of the Scarlet Cardstock to give it a vintage look. 


Here's the Valentine's I created for my hubby and son.  I used the Winter Gnomes Thin Cut and trimmed the blade off the ice skates to make regular shoes.  I learned the Ice Grey marker makes for great cellophane look and much less coloring!  The roses are colored with the middle shade of the Coral Shades marker.  It's RED, not coral when you're using the Coral Shades.  

I admit it, this card's a little cheesy, just how I like my Valentine's Day.  Surf and Turf are a favorite food of my hubby and I, but my son won't touch steak.  Pizza is a love language in our home.  That piece of pizza is a banner piece on the sticker sheet.  It's supposed to be roses, but not in my house.  


I adhered the banner to a piece of Shortbread cardstock and trimmed out like it was a slice of pizza.  It was super simple. This is a Z fold card.  I started with a 4.25" x 11" piece of White Daisy cardstock and scored it at 2.75" and 5.5" and folded it back and forth.  


This is my pride and joy!  Nine years ago, I did a series of "Seasonal Samplers."  I didn't care for the pink, grey and Glacier sampler and have been looking forward to updating it.  


After hanging it on my wall, I've decided to swap the light colored hearts under Be Mine to all Scarlet & Candy Apple, but that has yet to happen.  But I'm in love.  
This hummingbird is from Hummingbird Wings C2007 or Z7112 with Thin Cuts.  The flowers are stickers from the paper pack.  I dusted the back with Anti-static Pouch Z4220 and trimmed the ones that were a circle.  Then added 3D foam tape (1 or two layers) for dimension

This square features the doily and flourish from Sweet Memories Cardmaking Workshop Your Way.  The doily is cut from the paper pack.  

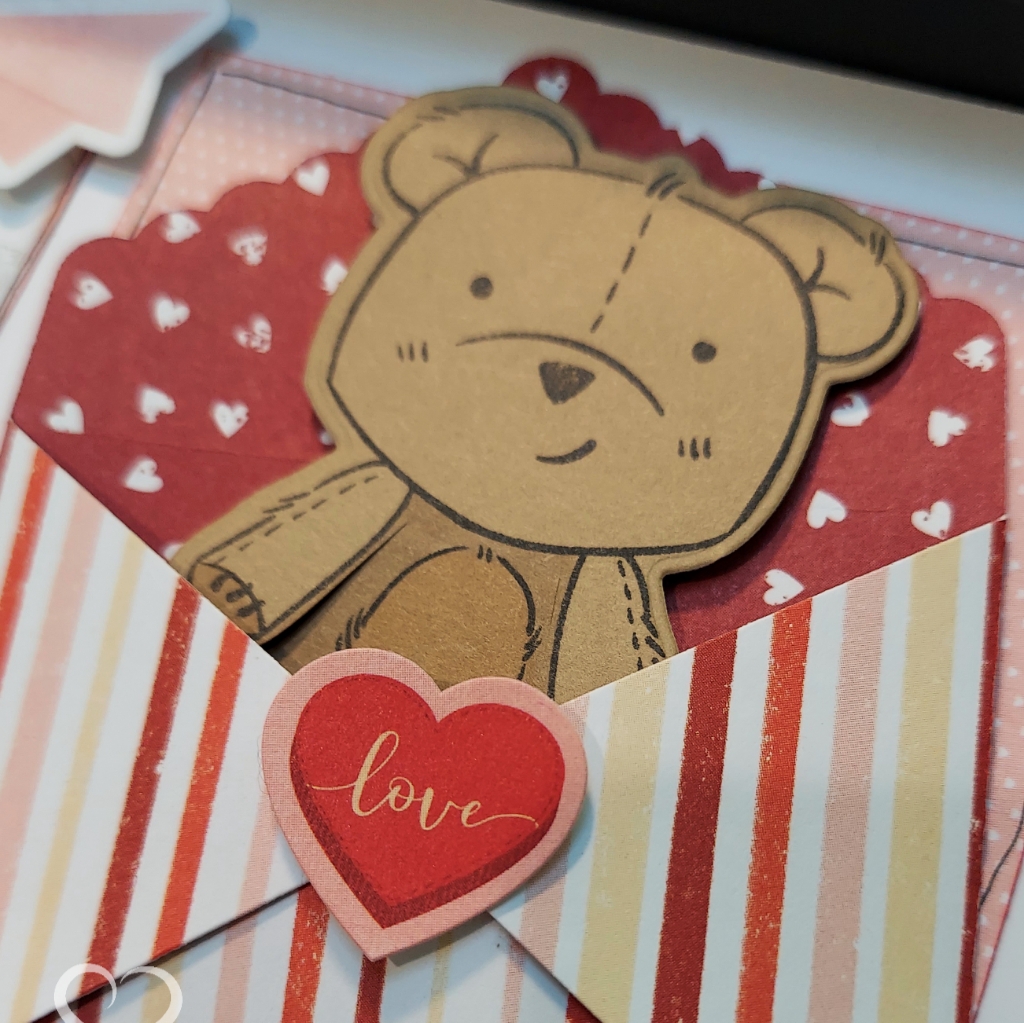
This little bear made 2 appearances on my sampler.  Once in the truck's tailgate and again the envelope.  


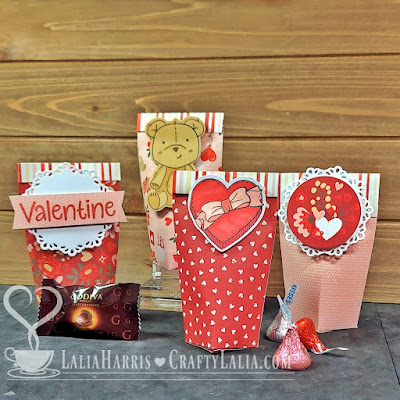
With the leftover paper, I created some little goody bags.  They are super simple and use a 5.5" square of paper and a 2.75 x 1" scrap at the top that's completely optional.  They're easy to make and are self closing, even without the pretty paper at the top.  They'll hold 2-3 Godiva chocolates or 8-10 Hershey kisses.  


Here's my cutting guide for the treat boxes.  Click to enlarge.  
fold all of the score lines inward and open flat.  Fold in the 1/2" strip and put adhesive on the side that is up.  Bring the other half of the bag over and fold it, adhering it like a flat tube.  Fold the first flap of the bottom down and inside the tube.  You'll squeeze the tube a bit so that it starts taking on a square shape.  Repeat with the 2nd flap.  Add adhesive to flaps 3 & 4 and secure, making sure the bottom of the bag is now square and the flaps overlap correctly.  You're done!  


Here's how to change the size of the treat box:  
For height, you can make them shorter or taller without changing the math.  Don't change the dimensions of the bottom of the bag in anyway.
For the base of the box, you want it to be 4 times the width of the base of the box plus 1/2".  If you want the base of the bag 2" you would need a piece of paper that is 8-1/2" wide.  2" for each side of the base and 1/2" for glue along the edge.  The base of the bag will always be square so you'll need to score 2" from the top of the paper to get square flaps.  

The biggest bag you could make from a 12x12 sheet of paper is making the base a 2-7/8" square.  You determine this by subtracting 0.5" from the 12" for the flap to seal the side.  This leaves 11.5" and that divided by 4 is 2-7/8" per bottom square. 
You would make a horizontal score line at 2-7/8" then turn and make the vertical scores at 2-7/8", 5-3/4" 8-5/8" and 11-1/2"  It would be 9-1/8" tall!  I'm not sure what you would want to put in it, but if it a try and let me know.  If you don't like 1/8" measurements, trim your paper to 11.5" and the score lines would be 2.75, 5.5, 8.25 & 11"  Whew!  

After all of this, please let me know which one is your favorite project by leaving a comment.  

Wednesday, April 30, 2014

You’ve Got A Friend! May Stamp of the Month Blog Hop

Well friends, if you’re reading this, we’ve just wrapped up an amazing month of April!  It’s now on to May, my favorite month of the Close to My Heart calendar!  It’s near and dear to my heart for two reasons.  One it’s the month I signed up as a consultant THREE years ago!  Another is the National Scrapbooking Day (or Month) specials.  Together they make an exciting and fun month. 
I’ll tell you more about the National Scrapbooking Month in another post but I’m mentioning it because this card is a 2-for-1 deal.  You get a sneak peek of the paper that’s only available in the month of May! 
This is a blog hop, so you can hop through 50+ blogs and see artwork on this stamp set called You’ve Got a Friend
1405-sotm-stamp
If you’re already hopping, welcome!  You should be arriving from Pamela’s blog.  Now you’ll get to see my artwork and then find the link to keep hopping some more! 
card-May-SOTM
I used the card design from the Originals How-To book by Jeanette Lynton.  The design is called “Pretty Simple” and you can download this design here.  It’s one of 3 patterns that we are encouraged share with you so you can preview how these amazing books work.  (You’ll be seeing more of them as the month goes on)
image
You can see that I stamped a little “out of the box” with the mustache.  I layered the mustache in Cocoa over the whole image that was stamped in Lagoon.  I also matted the squares with cardstock from our “Free to Be Me” paper pack.  That’s it!  I know this is a very simple card, but it’s fast!  And sometimes, you just need to create a quick card!  
Now hop on over to Melissa Laverty’s blog at

http://fancymelissa.com/2014/04/youve-got-a-friend-may-blog-hop/

Have a great day!

Wednesday, April 4, 2012

A Tale of Two Dino-Mite scrapbook layouts

Create a pair of "dino-mite" scrapbook pages for a girl and a boy. Simply by changing up your color palette, you can achieve a masculine or feminine look using the exact same stamp set! In this Close To My Heart video, we show you how to create the scrapbook pages featured on page 89 of the Spring/Summer 2012 Idea Book.

Friday, September 16, 2011

Hip hip hooray, I broke some rules!

Hooray Bouquet D1491 is a great Cricut Compatible Stamp set.  I love its three sentiments:  “hip hip hooray,” “may this be your grandest year yet,” and “you make me smile.” 

There’s an assortment of flowers and flower centers on this sheet so you can have layered flowers or large & small.  The best part is that it’s Cricut Compatible with the Art Philosophy Cricut Cartridge.

Each Cricut Compatible stamp set gives you the recommended size to cut your paper.  For this card, I didn’t follow their suggestions.  First, I eliminated the white border by making the flower a 1/4” smaller than the stamp sheet. Next, I added dimension to the center by enlarging it and using a scalloped cut instead of a basic circle.  My favorite way to break the rules is to repurpose a stamp.  The leaves were stamped using the same stamp I used on the petals after cutting the leaf shape with the Cricut.  I don’t need a leaf stamp when you have a great shape to cut on the Cricut! 

card CTMH

This card was finished with a
swirl in Honey ink from the D1482 Love Life 
Z1483 Bronze Glitz™ Glitter Gel
Green papers are from the X7137B Lucky Level 2 Paper Packet (Don’t just stamp on cardstock!)


Have a hip hip hooray day!