Showing posts with label Cricut. Show all posts

Monday, March 6, 2017

Hello Lovely Teapot


Where there's teacups, there needs to be a teapot.

I have a fascination with making 3D papercrafts and it wasn't hard to find a 3D teapot to go along with the teacups found in the March Stamp of the Month--Tea-rrific!

I immediately thought of the Hello Lovely paper for a teapot with its beautiful floral print.  The flowers reminded me of an English garden.  

Want to make one of your own? 

Here's how:  
❤  Attend my March 30th workshop!
❤  Buy a pre-cut kit from me for $8 plus shipping.
❤  Place a $40 order on my website and I'll send you a pre-cut kit for free!
❤  Purchase the SVG file from www.Cre8iveCutz.com and cut your own.
 You'll need a Cricut Explore, Silhouette or another type of die-cutting machine that can cut SVG files to do this.


Some notes about my teapot version.
I made it as bigger than what is shown on the Cre8iveCuts website.  It is 6.5" tall.  The bowl is 5.5" in diameter.  It spans over 10" from handle to spout.  The lid is removable so you can put items inside.  The opening at the top is approximately 2.5".  The spout is functioning.  You can pour Skittles or other small dry items from it. (or small Lego pieces according to my son).


I simplified the lid by using a Scalloped Circle from Art Philosophy.
The base of my teapot is green.  If you receive a kit, it will match the lid.
This teapot takes one sheet of patterned paper for the "skin" of the pot plus 3 sheets of cardstock.
It took me about just under two hours to assemble my first tea-pot while watching Netflix.
I used Aleene's Turbo Tacky Glue.  I have found it at Michaels, Wal-Mart and JoAnn's.
Scotch also makes this fast grab glue that works. Use that link to see what it looks like.  ((It's currently overpriced on Amazon.))

Do not use double-sided tape for assembly.

If you use my Amazon link, I will receive a commission from their affiliate program.

Thursday, January 5, 2017

First Card of the Year!

I pulled out my Hello Lovely paper yesterday morning after seeing my hunny off to work at 5 o'dark this morning on an extremely cold for us morning.  I needed to see some pretty spring papers!

As soon as I saw this floral print, I knew I wanted to make another V-pleated card similar to the one I created last spring.  You can see it and the tutorial for this card here.


I used the Ranunculus flower from Flower Market and the leaves from the Rose.

Here's my Design Space File for the flower.  
The tutorial & Design Space file for the folded portion is in this post.  
I cut the flower with Fern, Colonial White, Sorbet and the light Sorbet B&T from the paper pack.


I didn't need a lot embellishments so I used the new Gold Glitter Gems and a strip of  Rose Gold Foil Tape.


The Hello Lovely Paper Collection & Complements are available now thru April 30, 2017.


Don't forget about the Welcome Home Wreath that's only available this month. It's one of the most exciting promotions we've had in a long time and it's bound to sell out!

Tuesday, August 9, 2016

Flower Market Forget Me Nots

Hello friends,
Today I want to show you a beautiful card I created with the Flower Market Cartridge.

There's around 50 different types of flower and succulents on this cartridge along with many many other shapes.  We're not talking about 7 petaled flowers vs 3 petaled abstract flowers, but ones that you can actually identify.

Today, I'm using the Forget-Me-Nots.  I've also cut the banner and envelope from the Flower Market Cartridge. 

The light blue flowers and the Envelope liner were cut from our Whimsy Fundamentals.  I also used Pixie, Sweet Leaf and Crystal Blue cardstock (all part of the Whimsy color family) to complete this card.  I love sticking within a color family because I know that the colors are going to work together.  

I added a LOT of shimmer to a couple of the flowers using our new shimmer pen.  You can put on as little or lot as you want.  It's like eye shadow--a little goes a long way and an inexperienced user (that's me) put it on a little heavy.  


I love the dimension of this card even without embellishments.  
The sentiment is one of the stamps included in the Flower Market Bundle.  
This bundle has 2 sets of background stamps which are designed to add texture and a whole sheet of sentiments.  I LOVE sentiments, especially when my Cricut is doing all the hard work of creating beautiful die-cuts to put on my cards.  These stamps are perfect!  I'll be using them a lot. 

Want to make this card?  Here's the link for the Cricut Explore Design Space.

Shimmer Brush Z3293 (temporarily sold out, but will be in stock next week)
Crystal Blue Exclusive Inks (for inking flowers)


You can receive the Rustic Home paper pack for FREE this month when you purchase the Whimsy, Adventure & Enchantment Fundamentals!  (This plus the Flower Market Cricut Collection enables you to earn $25 in Hostess Rewards because it's a $150+ order/party!)  I have to set up the party before you place your order so contact me before ordering!  


Saturday, August 6, 2016

Hello Adventure Fundamentals

Here's a lively birthday card! 
This was one of the very first stamp sets I saw in this new Idea Book.  I knew I had to have it. There's this great sentiment that says, "Birthday Wishes to the smartest person I know.... BESIDES ME."  


CTMH has had numerous build-a-cake stamp sets over the years but this is the FIRST one that's Cricut Compatible.  That was another excellent reason for me to grab it too.  It's called Wise Guy Birthday, not Wise Girl... what's up with that?  

Wise Guy Birthday is also available in Spanish and French!  
French.  Check out all 7 French sets here.  
and Spanish. Check out all 7 Spanish sets here.  

I used the delicious new Raspberry cardstock to complement the Adventure Fundamentals paper.  Isn't it fun and bright?  We also have new black glitter paper pack. All of our glitter paper contain 3 sheets of the SAME color!  It's going to be wonderful for big projects, Christmas cards and layouts.  

Sea Glass cardstock made its way into this card as well.  It's the new black.  Or the new gray.  Or the new 2016 Color of the Year.  Anyway you label it, it's wonderful!  

You'll be seeing a LOT more of this set as it's on my schedule for a card kit in early October!  


Wednesday, August 3, 2016

Hello Sea Glass

Meet Sea Glass, the 2016 Color of the Year for Close to My Heart!

I'm thinking you may have been already introduced. It's a very popular color.  I've seen it at Hobby Lobby, Wal-Mart, Target, Kohls and even on a Grey's Anatomy preview for this fall.  

It's a pretty amazing color, it goes with EVERYTHING!  You'll see what I mean as I post more cards using Sea Glass!

Sea Glass is available in Cardstock, Glitter Paper, mini-pigment ink, ink pad & reinker.  The latter 2 will be available later this month.  

This new stamp set Hi Friend A1198 is an A sized stamp set at just $6.95 and is also available in French & Spanish!  It's one of 7 sets that have been translated to Spanish or French.  And the flowers (which are Cosmos) are compatible with the new Cricut Cartridge Flower Market!  

This card was made using the new Flower Market Cricut cartridge!  
It's filled with flowers and so much more!

Products used for this card
Shimmer Pen Z3293  this product is so amazing, it's already sold out.  Available 8/15.

Check back for more cards!  I was busy creating the whole month of July and just cannot wait to show you everything!  


Friday, July 1, 2016

Long live Casual Expresssions D1525

I love stamp sets that can be used for a wide variety of cards.  Casual Expressions which was released in 2012 when the Artiste Cricut Bundle debuted is just that.  Here's a peek at some of the cards I created with this great stamp set that is compatible to shapes on the Artiste.  
Both the stamp set and the Artiste Cricut Bundle are being discontinued at the end of the month.  


Here's the stamp set.  The faint red line indicates the Cricut Shape that matches.  

There's only one embellishment that's still available.  Can you guess what it is?  The answer is here.  

There's 1 month before all of this goodness disappears.  Get it before it's too late!


Tuesday, November 10, 2015

Thanksgiving Place Cards

Here's the place cards I created based on yesterday's pyramid card.  They're so easy!


I used the Sangria papers this time and the Artistry Cricut Cartridge for the leaf & banner. 
Here's the Cricut Design Space file.  The acorn is from our Art Philosophy Cartridge.  
If you don't have Design Space and an Explore, the Banner is 1.25" tall, the leaf is 2" and the acorn is 1.25"

Step 1:  Cut 3 squares at 4"  (You can cut them at 3" for a smaller place card.)
Score them corner to corner in just 1 direction.  Fold lightly and open back up.

Step 2:  Overlap 2 of the squares half way.  The fold will line up with the edge of the other square.
Adhere with strong adhesive.  

When you pull the first triangle over the last one, you'll get what we call a tee pee or tent.

Time to embellish.  Cut square at 3.75" or 0.25" SMALLER than the base squares.
Now cut them into triangles.  
Our SureCut Fiskars paper trimmer is great for this.  The wire lines makes it so easy to line it up and know that you're getting a perfect cut.  I've used mine for 3 or 4 years now.  

Step 5 is to apply adhesive to the back.  I love using a dot adhesive and our All-Purpose Mat.  (Actually I use only half of our mat; it's so big that I cut it in half)
NOTHING sticks to it.  And if it does, it comes up really easily.  This helps me get adhesive to and over the edge of my paper without making a mess.  

Repeat on all 3 large triangles.  The last triangle gets a little bit of contrasting paper (or the same).  I cut a 1.5" square diagonally to get this little triangle.

Now it's time to make your project stand up.  

There's two ways to do it.  One is with our Hook & Loop Dots (We can't call them Velcro (TM) because they're not made by Velcro Industries)

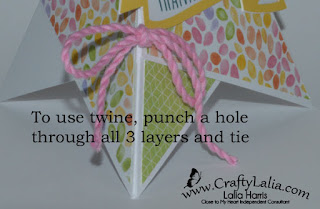
Another way to secure your flap is to punch holes through the 3 layers and tie with some extra thick baker's twine.  


Now to embellish and enjoy!  


I used the Etched Alphabet to stamp my name on the banner in Pomegranate ink.  
I added a Gold Bling Gem for a bit of sparkle.

I created a smaller version starting with 3" squares of Kraft Cardstock.
The pattern paper is 2.75" with a 1" punched circle for the name from the Champagne Cardstock that is included in the Sangria paper pack and tied it closed with Poppy Extra Thick Twine.

If you are not going to re-use these place cards, you can also just adhere the flap with adhesive instead of tying or using our Hook & Loop Dots.  

Be sure to check my previous post to see my first pyramid card.


Saturday, October 3, 2015

Happy World Card Making Day

Hello friends!  It's a beautiful fall day here and I'll be having some friends over tonight to make cards & the last Seasonal Sampler.

Here's one of the cards I made this morning for tonight's workshop using the Sangria papers and Sangria Assortment.


I created this with the leftover scraps from the Sangria samplers.  Even the Cricut shapes took up "leftover" paper from my sampler.  This pumpkin was used on the sampler.  I just resized it for the card.  

This card sketch is one of my favorites from the Make It From Your Heart Vol 2 Card & layout how-to book from Close to My Heart.  It's one of 12 great card sketches that includes the dimensions of each part of the card.  That's my favorite part!  


Monday, August 10, 2015

Best Friends

Do you ever scraplift?  


I created this card over the weekend using the early release products.  
I love the dogs and cats on the cartridge.  I also appreciate that there's 3 of each.  Not all dogs look the same!  

The "Best Friends" stamp is from the Artistry Cricut Collection so when you purchase the collection, you'll have everything you need to start creating a card like this.

Back to scrap-lifting.  I used this beautiful card from the current catalog as my inspiration.  


This card design is actually Design #26 from the Make It From Your Heart Volume 2.  This is a how-to booklet that gives you the cutting guide for card and scrapbook layouts.  It gives me the structure.  After that's it the fun part of embellishing!

What have you scraplifted lately?


Monday, August 3, 2015

Enjoy Artistry!


Here's my first card from the new CTMH Cricut Bundle 'Artistry'


This cartridge isn't fancy.  Instead it's amazing.  
No 3D flowers.  But gorgeous layered flowers
No 3D boxes.  But it has a mason jar on pg 2 that is lovely.
No 3D cards but hundreds of items to make a card
No scrapbook layouts but tons of titles, icons, borders and backgrounds.

And of course a coffee cup, latte cup on page 5 and items for tea on later pages.  

There's 700 shapes, many of which are layered making 442 grouped images in Cricut Design Space.

And a font that can be shadowed with a bold setting, normal or handwritten with a pen.  

CTMH has released the shape index so you can see everything that's part of the cartridge.  

And it's available as a Digital Cartridge for Explore users in Cricut Design Space for a $20 savings.  
A code will be shipped with the cardstock & 3 exclusive stamp sets.  

Are you excited about this cartridge? 
I have more artwork to show you!


Sunday, July 19, 2015

Here's where to find sneak peeks!

Here's some EXCITING news!

New goodies are coming the next 2 months.  

Find sneak peeks on Facebook & Instagram because I can't say what they are on my blog until they're released.  

or
Crafty Lalia on Instagram (no account needed to view Instagram)


Want to receive updates 1-2x a month?  

Monday, July 6, 2015

Seaside Sampler

I love the beach, don't you?  I love beach themed scrapbook supplies.  They remind me of the good times I have with friends and family.  I couldn't be more thrilled how this seasonal sampler turned out!  Even though Pacific Northwest beaches don't have palm trees, I see plenty of shells, star fish and a few sand dollars when I visit.


This seasonal sampler uses the "whole" Seaside collection of paper, complements (cardstock stickers) and the gorgeous metal assortment, all from Close to My Heart.  It's retiring August 31, 2015 if it doesn't sell out in the mean time.  The complements are currently on backorder and will return next week.

The Cricut shapes are from the CTMH Artbooking cartridge and the Cricut Life's A Beach cartridge.  If you don't own the beach one, you can now buy the individual shapes through Cricut Design Space which is a fabulous way to get a couple shapes without breaking the bank.  

I made 4 cards with about half of the remaining complements.  There was still a lot leftover! 

If you attend one of my workshops or order the kit, you'll receive pre-cut supplies to make the sampler & all four cards.

The cost for the whole kit is $25 plus applicable shipping.  Contact me if want a kit.  Due to the potential of sell-out, I'm not adding a PayPal button.  I'll check inventory before taking a payment.

You can also order the supplies from my website and I'll send you the kit instructions.  

Workshop dates:
July 18th
August 22nd (bring any kit to finish this evening)
Saturday's at 7pm

I need a bit of time to order and prepare your workshop kit, please RSVP with payment as soon as you can.  

Freedom Sampler

I hope everyone had a good Independence Day weekend!  
Here's the latest installment of my seasonal sampler.  


This one features Cranberry, Colonial White, Outdoor Denim and Kraft papers and lots of Desert Sand Ink to distress the edges of nearly every piece of paper.  

My year of seasonal samplers are coming to end very soon!  Why?  
The supplies are being discontinued this summer to make way for a whole new batch of fresh papers and complements.  If you'd like this sampler or any of my previous samplers, contact me now before it's too late!  The new catalog starts September 1st, but many of the supplies used in earlier samplers are already starting to run out.  (The Yuletide Santa themed Sampler is no longer available and I only have 1 kit remaining of the Snowhaven Sampler.)


Tuesday, October 21, 2014

Artfully Sent Halloween Pop-up card

Halloween is only 10 days away!  I better get my Halloween items posted.  This is one of several cards I created the day my Artfully Sent cartridge arrived.  I played around with most of the Halloween items and created some fun cards!

Here's the front of my card.  The web and spider are from page 43 of the handbook.  I welded the word Haunted using the Artfully Sent font in Cricut Craft Room.


Colors used are Slate, Goldrush, Smokey Plum and Black

Now for the inside...

Isn't it fun?  

This pop up was just so easy!  It's 2 pieces, 4 total if you count the tree and web.  The haunted house with fence in black were simply glued on to the "bracket" that's part of the card base.  The ghosts are also part of the card base.  They're cut to allow the color of the card front to show through.  
The haunted tree and headstone are one piece cut from Smokey Plum.  

I took a scrap of silver glitter paper and filled in the fence.  You don't need to but I was a little rough getting it off of the mat and it wanted to curl.  I filled in the windows with gold glitter paper.  

On the handbook pages below you'll see that items that work together are similar color.  The popup card is the lower page.  The popup has 4 elements that are all in various shades of orange.  They will be sized to work together to make a great card at 5."
  This is a 5x7 card.  It's 5" tall when folded so you'll set your dial size to 5"  


Love this card?  Get your own Artfully Sent cartridge here.  
Be sure to join my "Fabulous Customers" gathering and I'll send you a free My Reflections paper pack for free!  This offer expires 10/24/2014.