 If you're still thinking, big whoop, it's only a square. Try this on for size. I created a poinsettia using the flower in George by adding a triangle on to the tip of each petal to make a pointed petal. That means there are 6 elements for every flower. I had 46 flowers on 1 sheet (they were about 1" each) Being squashed together to conserve paper, I had to scoot each and every element over 1 arrow-key click to the right. That's click with the mouse then scoot with the arrow key 276 times!!! I hope someone sees this and is spared a little point and click-click by this. :) Have a good night.
Saturday, December 13, 2008
.cut file compatibility between baby & Big E
This just irks me. I was trying to get things ready for a crop last night and I couldn't figure out why my cuts were off. I wasted a ton of paper and time which threw off my whole night. Tonight I sat down and studied the situation. It wasn't me! How many of you are aware that the margins for the 12x12 mat are different than the 6x12 mat in DS? This matters if you try to cram as many cuts on a piece of paper as possible. Thus having lined up your cuts along the leading edge of the mat (the left side of the mat which is cut first!) I know a lot of you have upgraded to the Big E this season. Please keep this in mind! It's a real bummer if you have welded cuts like I do that involve lots of little shapes that have to be scooted over Take a look at my example:  If you're still thinking, big whoop, it's only a square. Try this on for size. I created a poinsettia using the flower in George by adding a triangle on to the tip of each petal to make a pointed petal. That means there are 6 elements for every flower. I had 46 flowers on 1 sheet (they were about 1" each) Being squashed together to conserve paper, I had to scoot each and every element over 1 arrow-key click to the right. That's click with the mouse then scoot with the arrow key 276 times!!! I hope someone sees this and is spared a little point and click-click by this. :) Have a good night.
If you're still thinking, big whoop, it's only a square. Try this on for size. I created a poinsettia using the flower in George by adding a triangle on to the tip of each petal to make a pointed petal. That means there are 6 elements for every flower. I had 46 flowers on 1 sheet (they were about 1" each) Being squashed together to conserve paper, I had to scoot each and every element over 1 arrow-key click to the right. That's click with the mouse then scoot with the arrow key 276 times!!! I hope someone sees this and is spared a little point and click-click by this. :) Have a good night.
Sunday, December 7, 2008
Welding & Detail Cuts in Design Studio
When I made the treat bags back in October, I noticed that I had some problems with the pumpkin showing all its features. See the example on the right. I filed a ticket with cricut via their website. They responded back with "it's a design feature." Yeah, that's what engineers say when there's a problem. I know, I've been one of them in my past life. Basically, in Design Studio, you have two options: to Weld or not to Weld. Some times you don't have a choice. But with using Cricut markers, you do. The image on the left was not welded. The pumpkin on the right was welded. All the detail cuts are gone.
Click on the picture to see all of it.
 This can be very helpful, especially if you're making cards or boxes. If you click weld on any TBBM item, it gets rid of those little tic marks for scoring (blackout doesn't do this). It also gets rid of those marks on any of the cards (I know this works for SYI & Plantin Schoolbook). In Plantin Schoolbook EndCaps feature, it also gets rid of the top & bottom cut line so you can add those letters on top of a larger shape. (I don't generally use the actual end cap shapes, but I love the stencil effect it makes). I hope this can help you out!
Treat Bag Swap
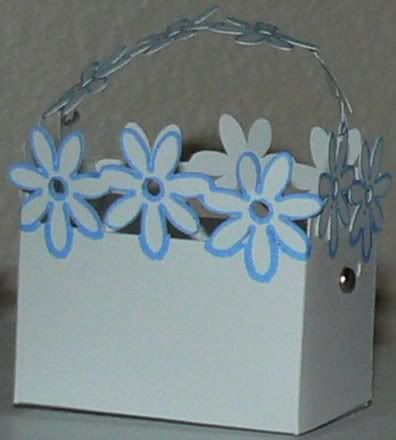
A while back I created some treat baskets for the the swap on the Cricut Design Studio Forum.

Daisy Basket only uses George. Baby Bug Compatible.
I used the cricut markers first, then cut it. Each are on different tabs in the same file

Pumpkin Treat Basket. uses George & PDDU. Baby Bug Compatible.
I've fixed it so that the cricut markers do the face very nicely. Do this before cutting.

This is a very old post and my file sharing expired. If need a file, please leave a comment with your email address and I will get it to you.
Daisy Basket only uses George. Baby Bug Compatible.
I used the cricut markers first, then cut it. Each are on different tabs in the same file
Pumpkin Treat Basket. uses George & PDDU. Baby Bug Compatible.
I've fixed it so that the cricut markers do the face very nicely. Do this before cutting.
This is a very old post and my file sharing expired. If need a file, please leave a comment with your email address and I will get it to you.
Monday, December 1, 2008
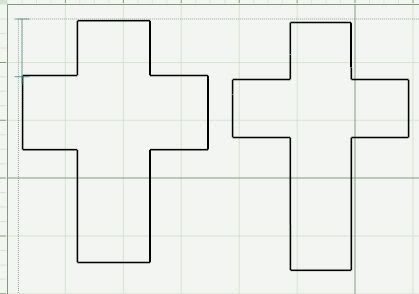
Crosses--I've fixed the download
luvmygirls asked for a cross on the Cricut MB. I created 2 adjustable ones so that she could make whatever size she wanted.
Please no drive by swiping! There were 15 people out there who downloaded the wrong file this week and not a single one of you said ANYTHING--not ooops, not thank you. I guess you get what what you are thankful for--nothing.
Subscribe to:
Posts (Atom)